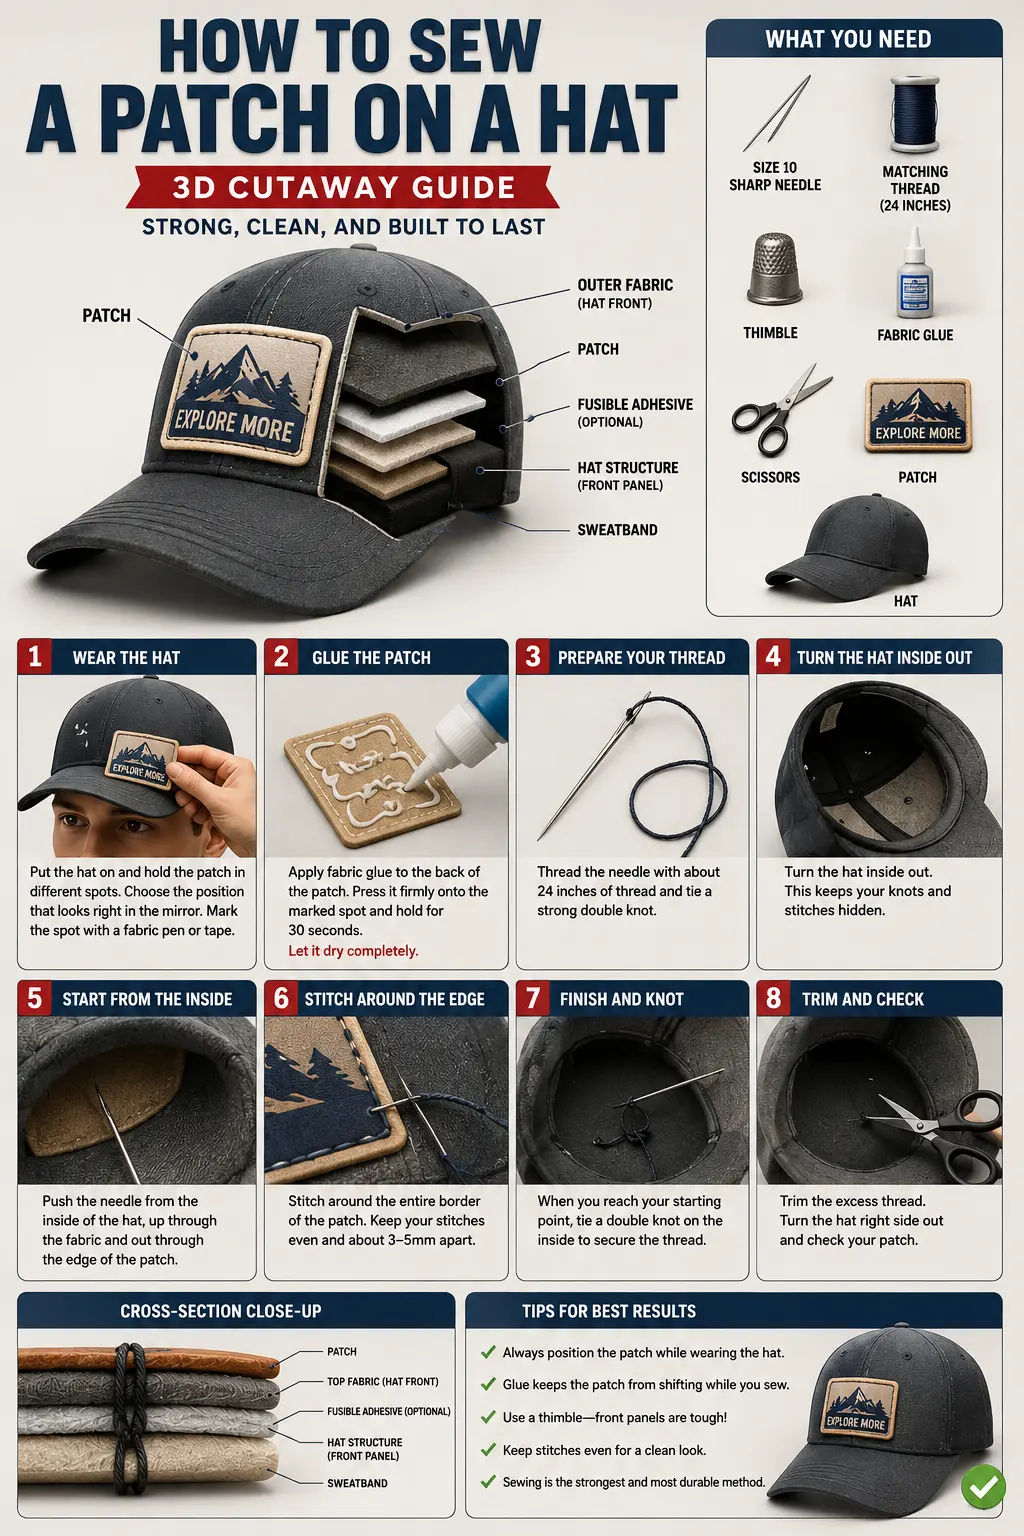
How to Iron a Patch on a Hat Properly
The Problem With Patching Hats
Ironing a patch onto a jacket or tote bag is relatively forgiving. Hats are not. The curved surface means you cannot press evenly. The internal structure (cardboard stiffening in the brim, plastic in the crown) reacts badly to sustained heat. And the wide variety of hat fabrics sold across the UK, from waxed cotton flat caps to polyester football caps to cotton twill snapbacks, means the same method does not work across the board.
Get it right and the patch looks sharp, sits flat, and stays put through weather and washing. Get it wrong and you end up with a warped brim, a scorched panel, or a patch that lifts at the corners by the end of the first week. This guide covers every hat type, every common mistake, and exactly what to do for a result that actually lasts.
Quick Answer
Check the hat material first cotton and canvas only. Set your iron to maximum heat with absolutely no steam. Support the inside of the hat panel with a folded cloth. Place the patch, cover with a press cloth, and press in slow circular motions for 15 seconds. Then press the edges specifically for another 15 seconds. Leave completely flat to cool for at least 10 minutes before touching.
Step 1 (Know Your Hat Material)
Before the iron goes anywhere near the hat, check the care label inside the crown.
This single step saves more ruined hats than anything else in this guide.
Works well with iron-on patches:
- Cotton twill baseball caps and snapbacks
- Canvas hats and bucket hats
- Heavy cotton beanies
- Cotton flat caps
Does not work (do not attempt):
- Polyester caps (the most common material in UK football, running, and sports headwear). Iron-on adhesive does not grip polyester reliably and heat can distort the fabric.
- Nylon caps (heat melts and bubbles the surface permanently).
- Structured caps with cardboard brims (sustained heat warps the cardboard brim and it does not recover).
- Waxed cotton caps (heat strips the wax finish and leaves permanent marks).
- Wool caps (too delicate for this level of sustained heat).
- Waterproof or treated caps (the iron destroys the DWR coating).
The honest reality for UK buyers is that a large proportion of caps sold on the high street, from sports retailers, football clubs, and online marketplaces, are polyester or polyester blends. If your hat falls into that category, iron-on application is not suitable. Sewing is the correct method and gives a far more reliable result on synthetic headwear.
If you are ordering best looking custom patches specifically for hats from makers like StitchKrafts UK, it is worth asking for patches with a sew-on backing option if your headwear is predominantly synthetic.
What You Need
Everything here is available at Hobbycraft, John Lewis haberdashery, or any well-stocked craft shop:
| Item | Purpose |
| Household iron | Maximum heat, no steam |
| Firm padded surface | Ironing board or folded towels on a worktop |
| Press cloth | A clean cotton tea towel or thin cotton pillowcase |
| Small folded cloth or hand towel | For supporting the inside of the hat panel |
| The patch | Face up, adhesive side down |
No special equipment. No heat press. Just a standard household iron used correctly.
Step 2 (Set Up the Iron Correctly)
Set your iron to its highest heat setting, typically the cotton or linen position on a UK iron dial, marked with three dots or the word MAX.
Turn the steam function off completely. This is not optional. Steam releases moisture into the adhesive layer while it is trying to activate and prevents a clean bond from forming. Every iron-on patch failure that gets blamed on the patch or the hat is actually caused by steam about half the time.
Let the iron heat for two to three full minutes before use. A partially heated iron produces a partial bond that looks fine on day one and starts peeling by the end of the week.
Step 3 (Prepare the Hat Properly)
This step is specific to hats and skipped by almost everyone the first time.
Lay the hat on your ironing board or padded worktop. Open the hat and slide a small folded hand towel or a tightly rolled piece of cloth inside the crown, positioned directly behind the front panel where the patch will go.
This does two things. It supports the panel from behind so you can apply proper downward pressure without the fabric collapsing inward. And it creates a buffer between the outer panel and the interior of the hat, protecting the brim structure from heat conducted through the fabric.
Without this internal support, you are effectively pressing against air. The patch will not bond properly because the pressure has nowhere to go.
Smooth the front panel as flat as possible before placing the patch. Any wrinkle or fold in the fabric at the application point becomes permanent once heat is applied.
Step 4 (Position the Patch)
Place the patch exactly where you want it, adhesive side down, embroidered or printed face side up.
For centred placement on the front panel, find the centre seam of the hat and align the patch to it visually. A small piece of masking tape above and below the patch can hold it lightly in place while you move to the next step without it shifting.
Take the time to get this right. Once the adhesive makes contact with the fabric under heat, clean repositioning is not possible without leaving residue and potentially damaging the hat surface.
Well-made custom embroidered patches from StitchKrafts UK have sharp, defined merrowed borders that make positioning straightforward. You can see exactly where the patch sits and adjust precisely before pressing.
Step 5 (First Press)
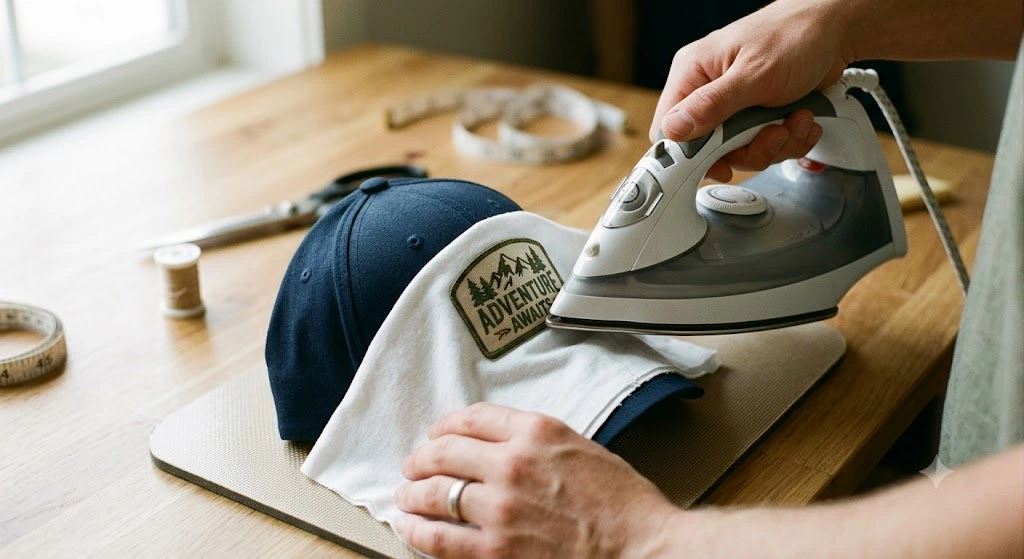
Drape the press cloth, your cotton tea towel or pillowcase, over the patch.
Place the hot iron on the cloth directly over the patch. Apply firm, even downward pressure and move the iron in slow, steady circular motions for 15 seconds. Circular motions work better than straight back-and-forth on a curved surface because they adapt to the slight contour of the hat panel and distribute heat more evenly across the full patch area.
After the initial 15 seconds, slow down and concentrate the pressure specifically around the edges and corners of the patch for another 15 seconds. The edges are where iron-on patches fail first on hats. The curved surface means the border gets less contact pressure than the centre during a standard flat press, so deliberate edge pressing compensates for that.
Step 6 (Check the Bond)
Lift the press cloth and set the iron aside on its heel.
Wait 60 seconds for the patch to cool slightly, then gently press each corner and edge with one fingertip. Do not peel, just press lightly and feel whether the patch sits firmly bonded or gives slightly under pressure.
If any edge or corner lifts, replace the press cloth and press again on that specific area for another 15 seconds. Focus the iron pressure directly on the problem section rather than repressing the whole patch.
Repeat until every edge feels solid under light finger pressure.
Step 7 (Cool Down Completely)
Leave the hat completely flat and undisturbed for at least 10 minutes.
The adhesive remains slightly soft and mobile immediately after pressing. Putting the hat on, reshaping it, or stuffing it into a bag before it has cooled fully causes the patch to shift, the edges to curl, or the bond to weaken before it has properly set.
Ten minutes on a flat surface. Then it is ready.
How to Keep an Iron-On Patch From Falling Off a Hat
Getting the patch on is one job. Keeping it there is another.
Do not wear it immediately. Sweat, heat from your head, and the physical handling of putting a hat on and adjusting the fit all put stress on the adhesive before it has fully cured. Leave the hat unworn for at least a few hours after application, ideally overnight.
Hand wash only. Machine washing is the fastest way to destroy an iron-on bond on a hat. The tumbling action, hot water, and detergent combination breaks down heat-seal adhesive quickly. If the hat needs cleaning, hand wash in cold water, reshape while damp, and leave to air dry.
Avoid high heat storage. Leaving a hat on a car dashboard or near a radiator in a warm room softens the adhesive over time and causes edges to lift gradually. Store hats away from direct heat sources.
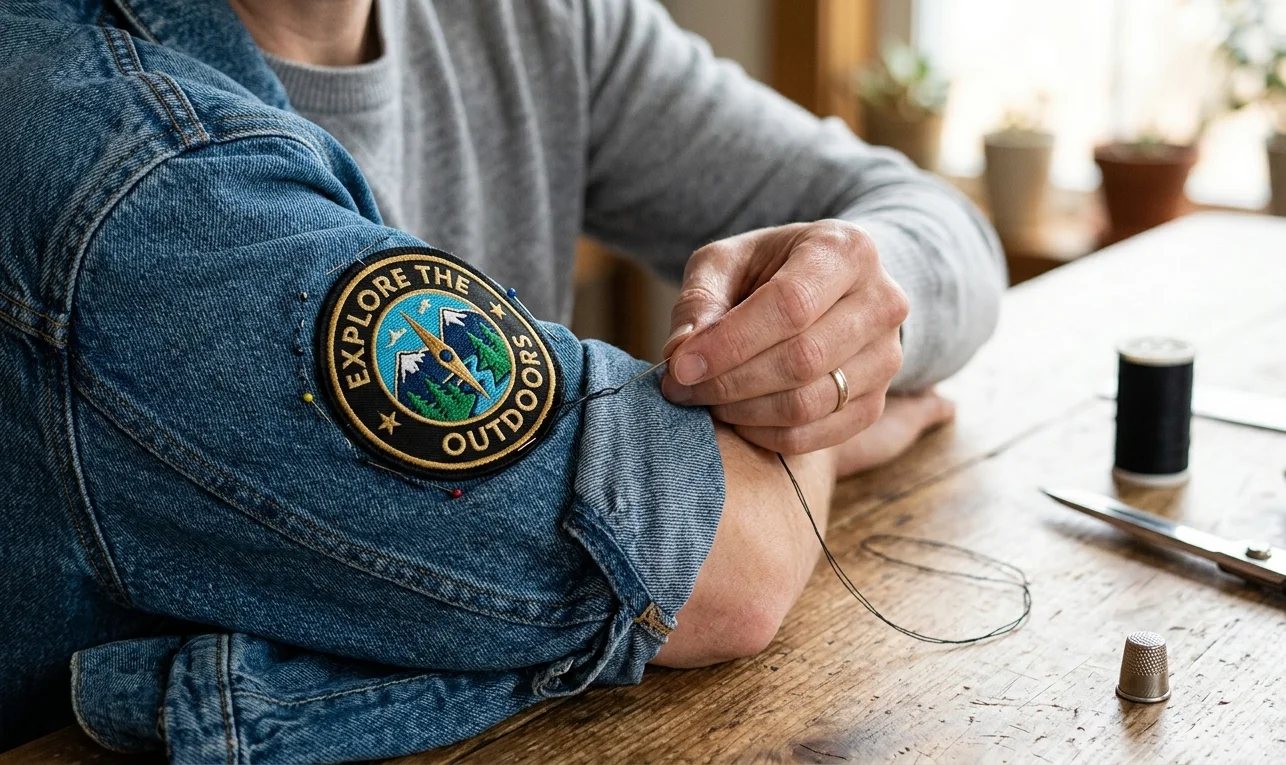
Sew the border after ironing. For a patch you actually want to keep long-term, on a favourite cap, a team hat, or a hat worn outdoors regularly in changeable British weather, stitch around the edge after bonding. Iron first to position the patch precisely, then use a needle and thread to stitch around the full border. This combination gives you the clean, accurate placement of iron-on with the permanent durability of hand-stitching. It is the only method that truly holds on a hat worn and washed regularly.
Start with a quality patch. A patch with thin, unevenly applied adhesive bonds inconsistently from day one. The centre seems solid but the edges lack grip. Quality custom embroidered patches use full-coverage backing with consistent adhesive weight across the entire reverse side, which means the bond holds from edge to edge rather than just in the middle. StitchKrafts UK patches are made to this standard specifically, which is why they bond more reliably and last considerably longer than budget alternatives.
Hat Types (Quick Reference for UK Buyers)
| Hat Type | Iron-On Suitable? | Best Method | Watch Out For |
| Cotton twill baseball cap | Yes | Press cloth, circular motion | Support inside panel first |
| Canvas bucket hat | Yes | Press cloth, circular motion | Check for any coating or treatment |
| Cotton flat cap | Yes | Press cloth, carefully | Curved seam structure (press flat panel only) |
| Cotton beanie | Yes with care | Lower heat, shorter press | Stretch fabric (do not pull while pressing) |
| Polyester sports cap | No | Sew only | Most UK club and team caps fall here |
| Football club cap | Check label | Usually sew only | Majority are polyester |
| Nylon running cap | No | Sew only | Heat melts surface |
| Waxed cotton cap | No | Sew only | Heat strips wax finish permanently |
| Wool or tweed cap | No | Sew only | Too delicate for sustained heat |
| Waterproof cap | No | Sew only | Iron destroys DWR treatment |
Frequently Asked Questions
Can you iron a patch onto any hat?
No. Only cotton and canvas hats are reliably suitable for iron-on application. Polyester caps, which cover the majority of sports, football, and athletic headwear sold in the UK, do not hold iron-on adhesive well and can be damaged by sustained heat. Check the care label before doing anything.
Why does my hat patch keep peeling at the edges?
The curved surface of a hat means the iron makes less contact with the patch edges than the centre during pressing. The fix is to press the edges specifically and deliberately for 15 seconds after the main press, focus pressure on any lifting corner when checking the bond, and stitch the border after ironing for a permanent hold.
Can you use a hair dryer instead of an iron on a hat?
No. A hair dryer does not produce the sustained, concentrated heat needed to fully activate iron-on adhesive. It is useful for softening old adhesive when removing a patch, but it cannot replace an iron for application. Use a household iron at maximum heat with no steam.
Is it better to sew or iron patches onto hats?
For most hats worn regularly, the iron-first-then-sew combination is the best approach. Iron to position the patch precisely where you want it, then sew around the border for a hold that will not loosen with wear or washing. Iron-on alone is sufficient for occasional-use or display hats that will not be washed frequently.
How long should you wait before wearing a hat after ironing on a patch?
At least a few hours, ideally overnight. The adhesive continues to cure after pressing and is vulnerable to stress from wearing, adjusting, and handling before it has fully set. Wearing the hat immediately is one of the most reliable ways to end up with a peeling edge within the first few days.
Can you iron a patch onto a beanie?
Yes, if it is a cotton beanie, but with care. Use slightly less heat than you would on a structured cap, press for shorter bursts rather than sustained pressure, and avoid stretching the fabric while pressing. Wool beanies are not suitable for iron-on application.
The One Thing That Changes Everything on Hats
Support the inside of the panel before you press.
A folded cloth or small towel tucked inside the hat behind the application area gives you a firm pressing surface, protects the brim structure, and ensures the pressure from the iron actually transfers into the bond rather than being absorbed by empty space inside the crown.
It takes ten seconds. It is the difference between a patch that bonds properly and one that looks right but lifts within the week.
Everything else, the circular press, the edge focus, the cooling time, reinforces that foundation. Get the support right and the rest follows naturally.