Your Hat Deserves That Patch. Here Is How to Make It Stick Around.
No wobbling. No crooked placement. No thread showing on the outside. Just a clean result you will actually be proud of.
Right Then. Let's Talk About Why Hats Are Awkward.
You have got a patch you really like. You have got a cap or a bucket hat you wear constantly. The idea of combining the two seems simple enough until you actually try it and realise that a hat is nothing like a jacket or a bag.
A jacket lies flat. A bag lies flat. A hat does not lie flat. It curves. It has structure inside it. The front panel sits at an angle. The whole thing changes shape the moment someone puts it on a head.
That is why patches end up crooked. That is why the thread shows through on the outside. That is why corners lift. Not because sewing is hard. Because nobody told you the two or three things that make the difference between a hat patch that looks brilliant and one that looks like an accident.
This guide tells you those things in plain English. No sewing experience assumed. No complicated language.
Before Anything Else. Three Things to Know.
One. Most UK sports caps, running caps, and outdoor hats are made from synthetic fabric. You cannot iron them. Sewing is the only option, and that is completely fine because sewing holds better anyway.
Two. Always check placement while the hat is on your head, never while it is sitting on a table. This single habit prevents the most common hat patch mistake.
Three. Glue the patch before you sew it. The glue does not hold it permanently. The stitching does that. The glue keeps the patch still while your needle goes round the border.
Remember those three things, and you are most of the way there before you even pick up a needle.
Quick Answer
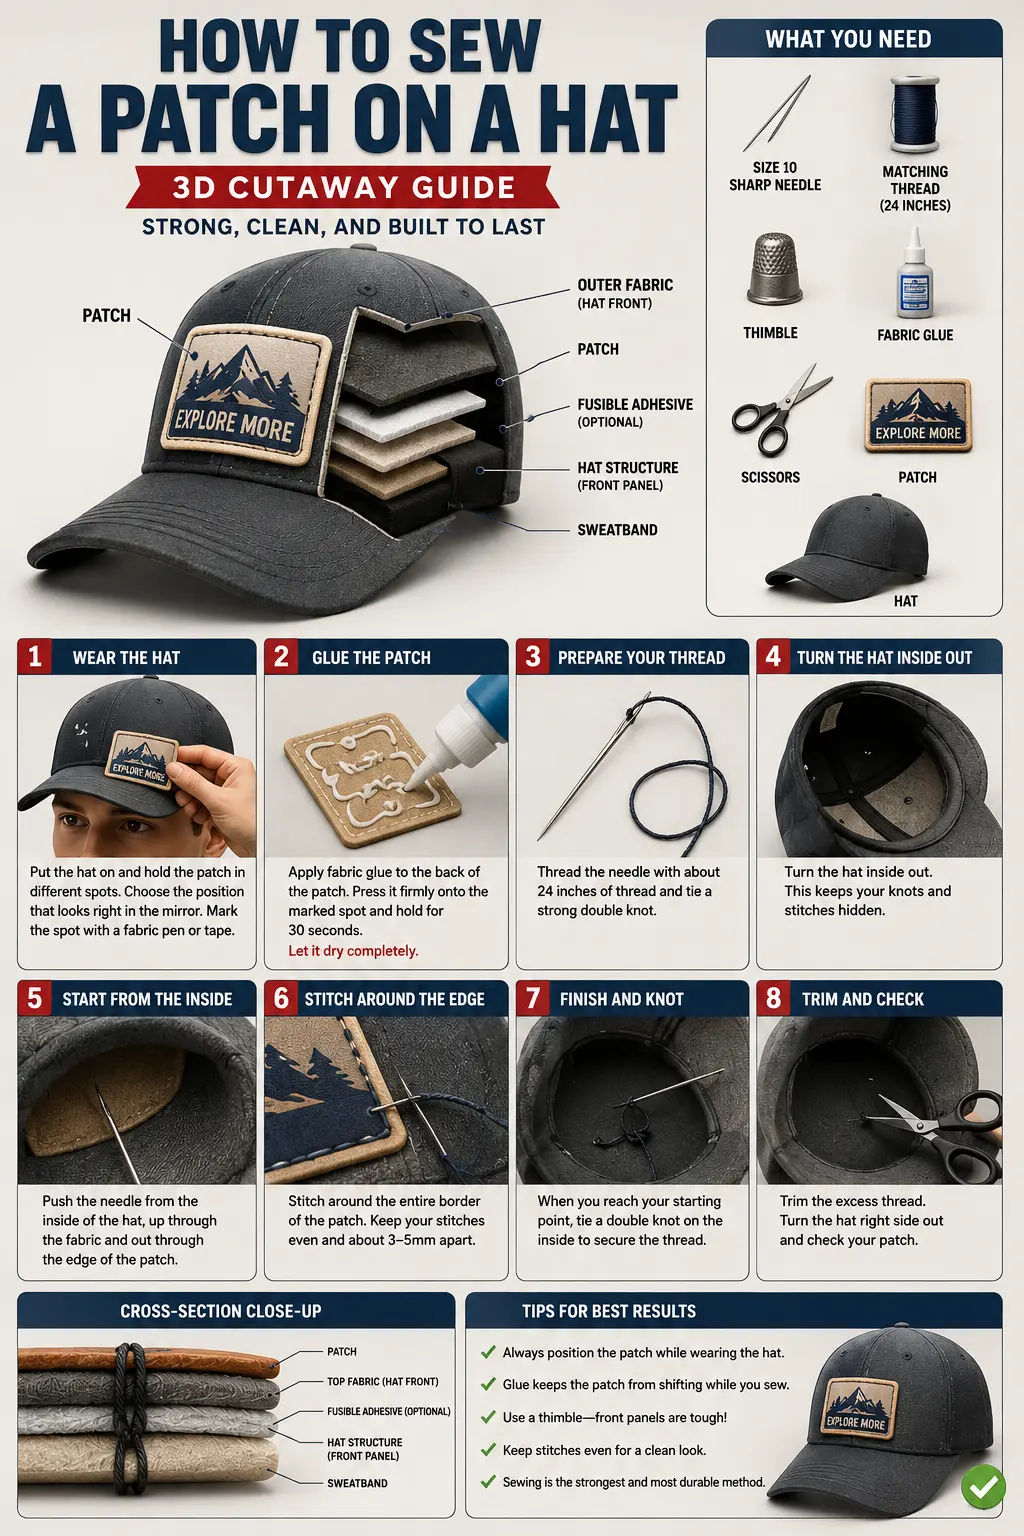
Put the hat on your head and decide where the patch looks right while you are actually wearing it. Mark the spot. Glue the patch there and leave it to dry properly. Thread a size 10 needle with about 24 inches of thread the same colour as your patch border. Tie a firm double knot. Turn the hat inside out. Push the needle from the inside through the hat fabric and out through the patch edge. Stitch all the way around the border evenly, keeping stitches 3 to 5mm apart. Tie a double knot on the inside when you finish. Trim the thread. Turn the hat back the right way. Done.
Check Your Hat First. Seriously.
Find the little label inside the crown of the hat and read it before you do anything else.
This tells you what the hat is made from, and that tells you how to handle it.
These hats are straightforward to sew a patch on:
- Cotton baseball caps and snapbacks.
- Canvas hats.
- Cotton bucket hats.
- Cord hats.
- Wool blend caps.
- Standard cotton beanies.
These hats can only be sewn on. No ironing ever:
- Nylon caps.
- Waterproof cycling caps.
- Technical running caps.
- Moisture-wicking sports caps.
- Anything with a DWR coating or a waterproof membrane.
Here is why this matters for UK buyers specifically. A huge number of caps sold in the UK at sports retailers and outdoor shops are synthetic. Cycling caps, football caps, running caps, hiking caps. Nearly all of them. If you iron onto these, the heat damages the fabric in a way that cannot be undone.
Please check the label to confirm whether the hat is cotton or canvas; great. If it says polyester, nylon, or anything technical, sew it on directly and skip any ironing completely.
The Kit You Need
Nothing on this list requires a special trip anywhere unusual. Hobbycraft, John Lewis haberdashery, or any general craft shop will have all of it.
- A size 10 sharp needle for most hats.
- A denim needle if you are working with a stiff structured cap or a chenille patch.
- Thread in a colour matching your patch border. About 24 inches of it for a standard patch.
- Small scissors for trimming the thread when you are done.
- A thimble for the middle finger of your sewing hand. Do not skip this. The front panels on structured caps resist a needle significantly, and your middle finger will be sore without it.
- Fabric glue. Any fabric glue from a craft shop works.
- The hat.
- The patch.
That is genuinely it.
Step One. Wear the Hat First.
Put the hat on. Hold the patch against the front of the hat in different positions while you are wearing it and looking in a mirror.
Try it high. Try it lower. Slightly left, slightly right. See what looks balanced. See what looks intentional rather than accidental.
The reason this matters is simple. A hat curves around a head in a way that completely changes how a patch looks compared to when the hat is lying flat on a kitchen table. A patch that looks perfectly centred on a flat surface can look noticeably tilted or too far left the moment someone actually puts the hat on.
Once the position looks right to you in the mirror, mark that spot with a tiny dot from a fabric pen or a small piece of masking tape. Take the hat off. That is your target.
Step Two. Glue. Then Wait.
Apply fabric glue thinly and evenly to the back of the patch. Press it firmly onto the marked spot. Hold it flat with your palm for about 30 seconds.
Now put it down and leave it alone until the glue is completely dry—usually around ten to fifteen minutes.
While you wait, here is why this step matters for hats specifically. When you sew, your needle goes in and out of the fabric dozens of times. Each push and pull puts sideways pressure on the patch. On flat fabric, this does not matter much because the patch is resting on a stable surface. On a hat, the curved surface means the patch can rotate or drift with each stitch if nothing is anchoring it. The glue is that anchor. Without it, you can start with perfect placement and finish with a patch that has moved by the time the last stitch goes in.
Step Three. Thread Up and Tie On.
Cut 24 inches of thread. The same length as roughly your arm from shoulder to fingertips.
Choose the colour carefully. If your patch has a merrowed border, which is the raised woven edge that runs around the outside of most embroidered patches, match your thread colour to that border exactly. When the colour matches, the stitching practically disappears into the border, and you get a completely clean result from the outside.
Thread the needle. If the thread end keeps missing the eye, wet the tip of the thread and twist it to a thin point before trying again.
Tie a knot at the loose end. Tie it twice. Hat fabric is tighter than shirt fabric, and a single knot can pull through under tension, especially on fine cotton or canvas.
Thimble on the middle finger. You are ready.
Step Four. Turn the Hat Inside Out.
This is the move that makes everything look clean and professional without any extra effort.
Turn the hat inside out completely so the lining is on the outside, and the hat fabric is facing inward.
When you start sewing from the inside, all your knots and thread ends stay hidden on the inner lining where they will never be seen. The outside of the hat shows only the neat, even stitching along the patch border. Nothing else. No lumpy knots. No stray ends poking through.
It is a small thing that makes a very visible difference to the final result.
Step Five. The First Stitch.
Hold the hat in one hand with the patch facing toward you through the now-reversed fabric. Hold the needle in your other hand with the thimble ready.
Push the needle from the inside of the hat through the hat fabric and out through the very edge of the patch in one push. Pull the thread through slowly and gently. Going too fast causes the thread to tangle on the inside.
Pull until the knot catches snug against the inner surface of the hat. That is your anchor. Everything else builds from here.
Step Six. Work Your Way Around.
Continue stitching all the way around the full border of the patch. The motion is the same every time.
Push the needle back down through the patch edge and through the hat fabric. Pull the thread through to the inside. Bring the needle back up from inside through the hat fabric and out through the patch edge again. Pull gently and firmly after each stitch.
Keep the stitches even. About 3 to 5mm apart all the way around. Consistent spacing is what makes the stitching look deliberate and tidy rather than uneven and rushed.
Take your time around curved edges and corners. Short neat stitches at corners keep the patch flat. If you try to take a long stitch across a corner, the patch edge lifts slightly at that point, and it only becomes more visible with wear.
Pull each stitch firm enough to sit flush against the fabric. Not so tight that the hat fabric puckers and gathers around the patch. Just firm enough to be flat and snug.
Step Seven. Finishing Off.
When you have gone all the way around and arrived back at the first stitch, bring the needle through to the inside of the hat one final time.
Tie a double knot as close to the hat fabric as you can. Two knots, not one. Trim the thread, leaving about half a centimetre of tail from the knot so it cannot work loose over time.
Turn the hat back the right way.
Look at it properly. The patch should sit flat and even. The stitching should run consistently around the full border. Nothing messy should be showing on the outside.
If one small section looks slightly uneven, that is completely normal for hand stitching and adds a handmade quality that actually looks great on a hat.
If You Have a Chenille Patch
Chenille patches are the thick, plush, raised patches that feel almost velvety when you touch them. Very popular right now across the UK for personalised caps and bucket hats.
They need two small changes.
Switch to a denim needle. The base of a chenille patch is much denser than a flat embroidered patch, and a standard size 10 will struggle or bend.
Stitch through the flat woven base at the very edge of the patch, not through the fluffy raised pile on top. The pile is the decoration. The flat base underneath is what holds the stitch.
And absolutely never try to iron a chenille patch onto a hat. The heat permanently crushes the pile flat. It does not recover. Sewing only. Always.
StitchKrafts UK makes personalised chenille patches with a solid flat sew-on base designed to grip the needle cleanly even on the first attempt. Whether you are ordering for a sports club, a school project, or personal use anywhere in the UK, the base construction means the stitching behaves exactly as it should from the first stitch to the last.
UK Hat Types at a Glance
- Cotton baseball cap ( the most beginner-friendly hat there is. Start here if it is your first time)
- Canvas bucket hat ( very easy to work with. Flat side panels mean the patch sits naturally)
- Wool flat cap ( use a sharp, fine needle and test in a hidden spot first. Short stitches throughout)
- Structured snapback ( stiff front panel. Thimble is essential. Take it slowly)
- Nylon cycling or running cap ( sew only. Never iron. Go slowly as the fabric is lighter and can shift)
- Waterproof hiking cap ( sew only. Never iron. The waterproof coating cannot recover from heat damage)
- Cotton beanie ( works well but the knit fabric stretches slightly while you sew. Go slowly and pull gently.
Does the Patch Itself Make a Difference?
Genuinely yes. More than most people expect.
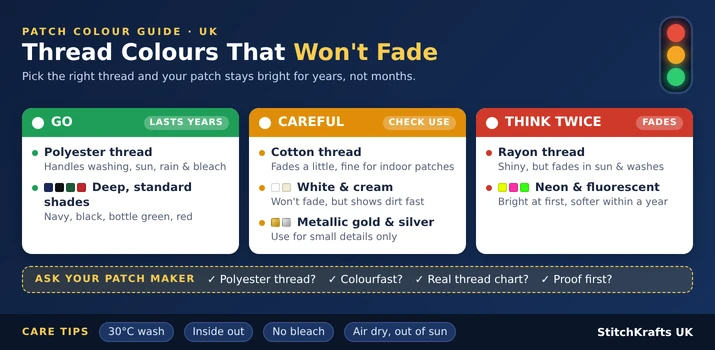
A poorly made patch has an uneven, wobbly border that is hard to follow with a needle. The base does not sit flat. The colours start fading after a few washes in the British rain.
A well-made patch has a clean, even merrowed border your needle follows naturally. The base lies completely flat against the hat fabric. The thread colours stay consistent through washing, rain, and general British weather.
StitchKrafts UK produces affordable embroidery patches and personalised chenille patches with merrowed borders built specifically for clean hand stitching. Every order includes a real physical sample sent to you before the full production run begins. You hold the actual patch, check the colour, feel the base, and confirm it is exactly right before the full quantity is ever made. That is not how most custom patch makers operate, and it makes a real difference to the result.
Frequently Asked Questions
Can you sew a patch on a nylon cap?
Yes, but sewing is the only option. Never apply heat to nylon. Pin the patch in position, check placement while wearing the hat, glue it, let it dry, then sew around the full border.
Why does my patch look wonky after I have sewn it on?
Almost certainly because you checked the placement with the hat lying flat on a surface instead of on your head. The hat curves differently when worn. Always decide placement while wearing the hat and checking in a mirror.
Do you need fabric glue if you are going to sew it anyway?
Yes. The glue holds the patch still while you sew. Without it, each needle push moves the patch slightly, and the placement drifts by the time you finish the border.
What thread colour should you use?
Match the colour of your patch border exactly. When the thread colour matches the merrowed edge of the patch, the stitching blends in and becomes almost invisible from the outside.
How long does the whole thing take?
Between 15 and 25 minutes once the glue has dried. Add around 10 to 15 minutes for glue drying time before you start sewing.
Where can I order custom patches in the UK?
StitchKrafts UK makes affordable embroidery patches, personalised chenille patches, and custom embroidered patches for buyers across the UK. Every order comes with a physical sample for approval before the full quantity is produced.