How to Remove a Sew-On Patch Without Damaging the Fabric
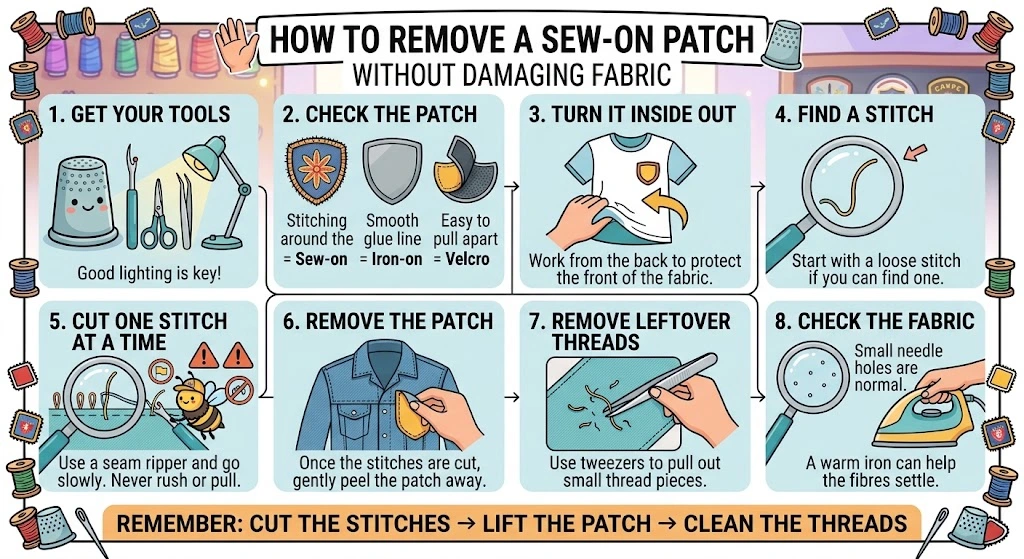
Quick answer: Do not pull the patch off with your hands. Use a small tool called a seam ripper to cut the little threads one at a time, then peel the patch away gently. Going slow is the real trick here.
Rather than going through this as one long list of steps, let's answer it a different way. Ask yourself a few simple questions, and each one will tell you exactly what to do next.
Question 1: What Tools Do You Actually Have?
Before you touch the patch, check what is in your sewing box.
Got a Seam Ripper?
Great, this is the best tool for the job. It is small, cheap, and made just for cutting stitches safely.
No Seam Ripper, But You Have Small Scissors?
These can work too. Just go slowly, since it is much easier to accidentally snip the fabric with scissors than with a seam ripper.
No Tools at All?
Do not try to pull the patch off with your fingers. This is the number one way people end up with a torn hole. Pop out and grab a cheap seam ripper first, it is worth the wait.
You will also want a pair of tweezers ready for later, plus good light. Sit near a window or use a lamp, since the little threads are hard to see in a dim room.
Question 2: Do You Know What Type of Patch This Is?
This matters a lot, since different patches come off in totally different ways. Flip the item over and check the back.
Can You See Stitching All Around the Edge?
This is a sew-on patch. Keep reading, this guide is for you.
Can You See a Smooth, Shiny Line Under the Patch Instead of Stitching?
This is an iron-on patch. Skip ahead to the section below on fixing a peeling iron-on patch instead, since cutting stitches will not help here.
Does It Peel Apart Easily With No Fuss at All?
That is a Velcro-backed patch. No tools needed, just pull it apart.
Question 3: Have You Turned the Item Inside Out?
Not Yet?
Do this now. Flip the jumper or jacket so you can see the back of the patch clearly. This is where all the stitching actually is, and working from here keeps the front of the fabric safe from scratches.
Already Inside Out?
Good, move on to the next question.
Question 4: Can You Spot a Loose Thread to Start With?
Look carefully along the edge of the patch.
Found a Stitch That Looks a Bit Loose or Sticks Out?
Perfect, start right there. Slide the tip of your seam ripper gently underneath it.
Everything Looks Tight and Even?
Pick any stitch along the edge and start there instead. It does not need to be perfect, any starting point works fine.
Question 5: Are You Cutting One Stitch at a Time, or Rushing?
This is the step where most mistakes happen, so be honest with yourself here.
Cutting Slowly, One Stitch at a Time?
You are doing this exactly right. Keep going all the way round the patch.
Tempted to Cut a Few Stitches at Once, or Getting Impatient?
Slow down. This is exactly how fabric ends up torn. One stitch at a time really is the whole secret to doing this without damage.
Found a Stitch That Will Not Cut Easily?
Do not force it. Skip that one for now and come back to it once the rest are done.
Question 6: Is the Patch Ready to Come Off Yet?
Lifting Away Easily on Its Own?
Gently peel it back with your fingers rather than yanking it.
Still Stuck in One Spot?
Stop pulling. There is almost always a missed stitch holding it there. Have another look at that exact spot before trying again.
Question 7: Are There Bits of Thread Left Behind?
Yes, Small Bits Poking Through the Fabric?
Use your tweezers to pull these out gently, one at a time. Do not rush this bit, since tugging too hard can stretch the little holes underneath.
All Clear Already?
You are basically done.
Question 8: Worried About Holes in the Fabric?
Can You See Tiny Holes Where the Stitching Used to Be?
This is completely normal. Sewing always leaves small marks where the needle went through, and most are barely noticeable once the item is worn as usual.
Holes Look a Little More Visible Than You Would Like?
Try pressing a warm iron over that spot. It helps the fabric fibres settle back down. Thick fabric, like denim, tends to show these marks even less.
Got a Peeling Iron-On Patch Instead?
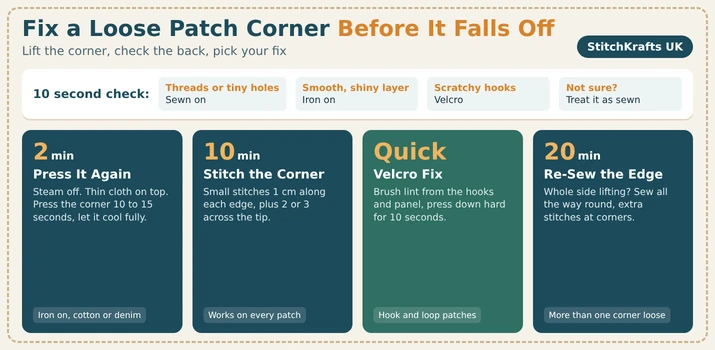
If you checked back at Question 2 and realised your patch is actually iron-on, not sewn on, here is the fix instead, and it is a much quicker one.
Place a thin cloth over the patch and press a warm iron on top for several seconds. This softens the glue underneath. Press down firmly and hold it there a little longer to help it bond again.
Still lifting after that? The glue underneath may be too worn out to hold anymore. At that point, it is easier to remove it fully with heat and start fresh.
Frequently Asked Questions
Will Removing a Patch Leave Holes in My Clothing?
Just very small ones from the original stitching, and these are usually barely noticeable, especially on thicker fabric.
Can I Remove a Sew-On Patch Without a Seam Ripper?
Yes, small sharp scissors work too, though you will need to go slowly to avoid cutting into the fabric underneath.
Is It Safe to Remove a Patch From Leather or Denim?
Yes. Thicker fabric is actually more forgiving, since it is sturdier and less likely to show marks afterwards.
What Is Different About Removing a Sew-On Patch Compared to an Iron-On One?
A sew-on patch needs its stitches cut with a seam ripper. An iron-on patch needs heat from an iron to loosen the glue instead.
Can I Put a New Patch in the Same Spot After Removing the Old One?
Yes, in most cases. Just make sure the leftover thread is cleared and the fabric lies flat before attaching anything new.
Ready to Replace It With Something New?
Once the old patch is off, it is the perfect moment for an upgrade. StitchKrafts UK makes custom sew on patches designed to hold up to years of wear, whether you are in London, Manchester, or anywhere else across the country. And if you are working on a brand new design from scratch, our custom embroidery digitizing service can turn your artwork into a ready-to-stitch file, so your next patch comes out exactly the way you pictured it.