How to Sew a Patch on a Vest Without Puckering
Hey, so you have got a vest and a patch. You are ready to sew it on. But you are worried it might look bunched up or wrinkly once you are done. That is called puckering. And yes, it happens to a lot of people, even ones who have sewn before.
The good news? It is easy to avoid once you know why it happens.
Short answer: Puckering happens when your stitches pull the fabric unevenly. Some spots get pulled tight. Other spots stay loose. To stop this, pin the patch down first. Sew with small, even stitches. And keep the same tension the whole way round.
Let us walk through this together, step by step, like I am sitting right there with you.
First, Let Us Talk About Why This Happens
Picture this. You start sewing. Everything looks fine. Then halfway round, you notice a little bump. A tiny ripple in the fabric near the patch.
What happened? One of your stitches was probably a bit tighter than the ones before it. That tug pulls the fabric inward. And once one spot is uneven, the rest of the patch has to sort of compensate. That is where the pucker comes from.
This gets worse on thick fabric. Denim and leather do not stretch much at all. So any little mistake in your stitching shows up fast. On a soft cotton shirt, you might get away with it. On a vest, you usually will not.
Okay, now that we know what causes it, let us fix it before it even starts.
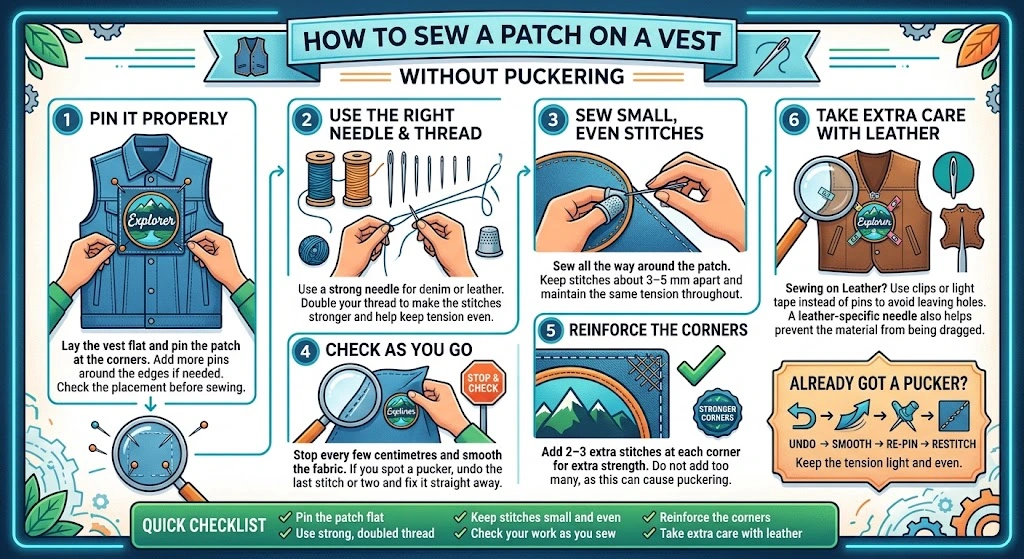
Step 1: Pin It Down Properly
This step gets skipped a lot. People just hold the patch in place with one hand and start sewing with the other. Please do not do this.
Lay your vest flat on a table. Not on your lap. A table gives you a flat, steady surface to work on.
Now pin the patch down. Put a pin in each corner. If the patch is big, add a few more pins around the edges too.
Once it is pinned, step back. Look at it from a bit of a distance. Does it look straight? Is it centred where you want it? This is the moment to fix that, not after you have already sewn half of it on.
Step 2: Get the Right Needle and Thread
Vest fabric is usually thicker than a regular shirt. So a flimsy needle and thin thread are going to struggle.
If your vest is leather or heavy denim, grab a stronger needle. One made for thicker material.
And here is a small trick that makes a big difference. Double up your thread. Just fold it over before threading the needle. This makes your stitches stronger. It also helps you keep your tension even, which is exactly what stops puckering.
Step 3: Sew Slowly, All the Way Around
Now for the actual sewing.
Go all the way around the edge of the patch. Do not just do a few stitches here and there and call it done. The whole border needs stitching, or the edges that are not sewn down will start lifting later anyway.
Keep your stitches small. Somewhere around 3 to 5 millimetres apart works well.
Here is the big one. Keep your tension the same on every single stitch. Do not pull one stitch really tight and then leave the next one loose. That inconsistency is basically the number one cause of puckering.
If you are working on leather, go extra slow. Leather has zero stretch. If you rush the needle through, it can drag the material slightly with each stitch. That dragging is exactly what creates that rippled look.
Step 4: Check Your Work As You Go
Do not wait until you have finished the whole patch to check how it looks. That is when people usually panic, because by then, fixing it means undoing a lot of work.
Instead, stop every few centimetres. Smooth the fabric flat with your hand. Take a quick look. Does it look flat? Or is there a little bunch starting to form?
If you spot it early, just undo the last stitch or two and redo that bit with lighter tension. Takes an extra minute, saves you a headache later.
Step 5: Reinforce the Corners
Corners take the most strain. Especially on a vest that moves a lot, like one you would wear on a motorcycle.
Once you have gone all the way round the patch, go back and add two or three extra stitches at each corner. This gives them a bit more strength without weakening the rest of your stitching.
Just do not go overboard here. If you cram too many stitches into one tiny spot, that can actually cause its own little pucker. A few extra stitches is plenty.
What if the Vest Is Leather?
Leather plays by different rules. It does not stretch at all, so treat it a bit more carefully.
Pins can leave small holes in leather that do not go away. So instead of pinning, use clips or a little tape to hold the patch steady while you sew.
Also grab a needle made specifically for leather if you can. A regular needle can get stuck halfway through and drag the material, which again, leads to puckering.
This bit matters even more if you are trying to attach a patch to a leather jacket instead of a vest, since jackets move around even more as you wear them.
Where Puckering Shows Up the Most
Not every part of the vest is equally at risk.
The back panel and the chest area move the most as you walk around, sit down, or ride a bike. This is exactly where a lot of custom patches usually go, so these spots deserve a little extra patience.
Corners, like we said, are also a weak point. They get pulled and tugged more than anywhere else.
Already Got a Pucker? Here Is How to Fix It
Do not stress, it is fixable.
Find the puckered bit. Carefully undo the stitches right around that area.
Smooth the fabric flat again with your hand.
Re-pin it if you need to.
Sew that section again, nice and slow, keeping your tension light and even this time.
That is really all it takes.
A Simple Checklist to Keep Nearby
Pin the patch flat and double check it looks straight.
Use a strong, doubled thread.
Sew small, even stitches the whole way around, not just here and there.
Stop and check your work every so often instead of waiting till the end.
Add a few extra stitches at each corner, but do not overdo it.
Take your time on leather especially.
Some Quick Questions People Usually Ask
Why does my patch still pucker even when I am careful?
It usually comes down to tension. Even one stitch pulled tighter than the rest can cause a little ripple.
Should I just use a sewing machine instead?
For fabric vests, a machine works fine. For leather, most people find hand sewing gives more control and fewer mistakes.
Can I fix it after I have already finished sewing?
Yes, definitely. Just undo the stitches near the puckered bit, smooth it out, and sew that part again with a lighter hand.
Do motorcycle patches need any special care?
A bit, yes. They often sit on the back of a vest, which moves a lot. So extra stitching at the corners really helps them last.
What is the real difference between sewing on denim and leather?
Denim has a little give, so small mistakes are more forgiving. Leather has none, so slow and steady is the way to go.
Want a Patch Ready Before You Even Pick Up a Needle?
If you are looking for embroidered patches near me, StitchKrafts UK has got you covered. We help people across London and Birmingham personalise and customise vests and jackets with patches made just for them. Come chat to us first, get your patch sorted, then sit down and sew with confidence.