Fixing a Patch That's Started to Fray at the Edges
Quick answer: Trim any loose threads with small, sharp scissors. Then seal the edge with a dab of fray stopper liquid, or sew small stitches around the border to hold it in place. Do not pull the loose threads, because pulling makes it worse.
A frayed patch looks messy, but it is usually easy to fix at home. The trick is to catch it early. Let's go through it step by step.
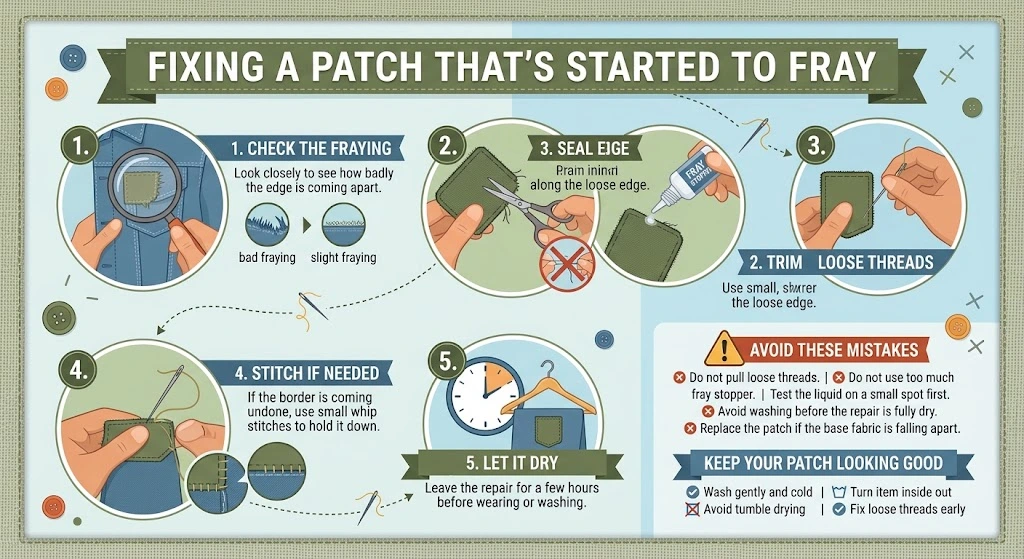
The Short Version: 5 Quick Steps
- Look closely at the edge to see what kind of fraying you have.
- Trim the loose threads with small, sharp scissors. Do not pull them.
- Seal the edge with a tiny drop of fray stopper liquid.
- Sew small stitches around the border if it needs extra help.
- Let it dry fully before wearing or washing it.
That is the quick way. Now let's look at each step properly, including what to do when the simple fix is not enough.
The Long Version: Every Step Explained
Step 1: Find Out What Kind of Fraying You Have
This is the step almost every guide skips, and it matters a lot. Fraying comes in three kinds, and each one needs a different fix.
Kind 1: A few loose threads. The edge still looks tidy, but a few little threads are sticking out like hairs. This is the easiest kind to fix.
Kind 2: The edge is coming undone. The thick, wrapped border around the patch is unravelling, and you can see a gap or a loose loop of thread. This needs stitches to fix it.
Kind 3: The fabric underneath is falling apart. The patch's base fabric is splitting or crumbling at the edge, and the border has gone completely. This one is very hard to fix, and it is often time to replace the patch.
Look at your patch in good light. Which kind does it look like? Now you know which steps to follow.
Step 2: Trim, Never Pull
Whatever kind you have, do this first. Use small, sharp scissors, like nail scissors or embroidery scissors. Snip each loose thread as close to the patch as you can, without cutting into the border.
Never pull a loose thread. It feels natural to tug it, but a patch is made of thousands of threads linked together. Pulling one can drag a whole line out with it, and a tiny problem becomes a big one.
If a thread is stuck, cut it a little shorter and leave it. A small stump is much better than a hole.
Step 3: Seal the Edge With Fray Stopper
Fray stopper is a clear liquid that you can buy in most craft shops and sewing shops in the UK. It soaks into the thread ends and dries hard, so they cannot come loose again.
Before you use it, test a small spot first. On some fabrics, it can leave a stiff patch or a dark mark. Wait for it to dry fully and check that it looks fine.
Then do this. Put a very tiny amount on a cocktail stick or a cotton bud. Dab it along the frayed edge. Do not rub it, and do not use too much, because a little goes a long way. Leave it to dry for at least an hour, and longer if you can.
This works best for Kind 1, the loose thread problem.
Step 4: Stitch the Border Down
If the border is coming undone (Kind 2), liquid on its own is not strong enough. You need thread.
Pick a thread that matches the colour of the border. Thread a needle and tie a small knot at the end. Push the needle up from underneath, close to the edge. Then wrap the thread over the edge and push the needle back down. Do this again and again, keeping the stitches small and close together, about 2 to 3 millimetres apart.
This is called a whip stitch. It wraps around the edge and holds it in place, just like the original border did.
Work slowly all the way round the problem area. Go a little past it on each side, since the next bit of border is often weak too. Then tie off the thread on the back and trim the end.
If you want more practice with neat, even stitches, our guide on sewing a patch on a sleeve shows how to keep them tidy.
Step 5: Let It Rest Before You Wear or Wash It
After using liquid or stitches, leave the patch alone for a few hours. The glue needs time to dry all the way through. If you wash it too early, the liquid washes out, and you have to start again.
When you do wash it, use a cold, gentle setting, and turn the item inside out. This protects the repaired edge from rubbing.
A Warning About the Lighter Trick
You might see videos online where someone burns the loose thread ends with a lighter. It can seal tiny thread ends on some patches.
But please be careful. It is a fire risk. Cotton thread can catch fire, polyester thread can melt and drip, and the heat can ruin the patch or the clothes underneath. For a child or a first timer, fray stopper liquid is much safer. If you do try a flame, only touch the very tip of a loose thread, and keep a bowl of water nearby.
Why Do Patch Edges Fray in the First Place?
Knowing why helps you stop it coming back.
The border of a patch is made of thread wrapped tightly around the edge. This wrapped edge locks the raw cut edge inside, so nothing can come loose. When the patch gets rubbed, scratched, or washed a lot, those threads can wear thin and snap one by one.
Common causes include hot washing, rough tumble drying, rubbing against a bag strap or seatbelt, and cheap patches that have a thin border to begin with. Once one thread breaks, the others tend to follow.
When to Replace the Patch Instead
Sometimes a repair is not worth the trouble. It may be time for a new patch if the base fabric is splitting, if the border has gone around more than half the patch, or if you have repaired it before and it keeps coming back.
If this happens, you can replace it with a better made one. A good quality embroidered patch has a tight, thick border that is built to resist fraying, which makes it a smart choice for jackets and bags that get a lot of use.
How to Stop It Happening Again
Wash your patched clothes on a cold, gentle setting. Turn them inside out first. Skip the tumble dryer where you can. Check your patches every few weeks and trim any new loose threads straight away. And choose patches with a firm, well made border from the start.
If you are about to put a patch on something new, our guide on ironing patches on easily can help you start off well.
Common Mistakes to Avoid
Pulling loose threads instead of cutting them. Using far too much fray stopper, which makes the edge hard and shiny. Skipping the test spot. Washing the patch before the liquid has dried. Using thread in a very different colour, so the repair stands out. And trying to rescue a patch that is falling apart completely, when a replacement would look much better.
Frequently Asked Questions
How do you stop a patch from fraying?
Trim the loose threads, then seal the edge with fray stopper liquid or sew small stitches around the border to hold it down.
Is it safe to pull loose threads off a patch?
No. Pulling can unravel more of the stitching. Always cut loose threads with small, sharp scissors instead.
Does fray stopper work on embroidered patches?
Yes, it works well on loose thread ends. Test a small spot first, since it can sometimes leave a stiff or shiny mark.
Can I fix a patch that has lost its border completely?
It is very difficult. If the border has come off a large area, replacing the patch usually gives a better result.
Why does my patch fray after washing?
Hot water, rough spinning and tumble drying wear down the border threads. A cold, gentle wash with no dryer helps a lot.
Should I use glue or stitches to fix a frayed edge?
Use liquid for a few loose threads, and stitches when the border itself is coming undone.
Need a Patch That Lasts?
Our custom patches are made with strong borders designed to handle everyday wear. Whether you are in Manchester or anywhere else in the UK, StitchKrafts UK can help you choose the right border and material before you order.