How to Iron On Patches Without Damaging Fabric: The Complete UK Guide
There is something deeply satisfying about pressing a patch onto a jacket and watching it bond perfectly into place. But ask anyone in a UK crafting group, from Birmingham sewing circles to Edinburgh DIY forums, and you'll hear the same story repeated. The patch looked great for a week, then one corner lifted, then the whole thing peeled off in the wash. The iron on process is simple, but only when you know exactly what you're doing.
This guide covers everything: fabric checks, heat settings, the pressing technique that actually holds, and the aftercare that keeps custom embroidered patches looking sharp for years. Whether you're working with a custom sublimation shirt for a sports club in Manchester or decorating a canvas tote for a market stall in Brighton, the method is the same.
The First Move: Check the Care Label
Before the iron leaves the cupboard, check the care label stitched into your garment. This single step prevents most of the disasters people write about online.
A crossed out iron symbol or a "dry clean only" instruction means heat is off the table. Applying an iron to that fabric will damage it permanently, and the patch adhesive won't bond properly to a compromised surface anyway. You end up with two problems for the price of one bad decision.
Fabrics that work well with iron on patches include cotton, denim, canvas, most polyester blends, and wool blends with a press cloth. Fabrics to avoid entirely are nylon, rayon, silk, leather, vinyl, and anything waterproof or coated. Nylon buckles and melts. Rayon scorches faster than you'd expect. Leather cracks and stains permanently. No patch is worth destroying a garment over.
At StitchKrafts UK, every custom embroidered patch order includes fabric compatibility guidance because a patch that doesn't bond correctly is a patch that reflects poorly on everyone.
What You Need
Nothing here requires a specialist shop. Everything is already in most UK homes.
You need a standard household iron set to its highest heat with steam turned completely off. An ironing board, or two folded towels on a firm table. A press cloth, such as a cotton tea towel, a thin pillowcase, or any clean cotton fabric. A measuring tape if placement precision matters. And your patch, adhesive side down, face side up, ready to go.
UK household irons typically reach around 200 to 210°C on their highest setting, which is more than sufficient to activate the thermoplastic adhesive used on quality iron on patches. If a patch isn't bonding at full heat, the problem is almost always the fabric type or insufficient pressing time, not the iron's temperature.
How to Iron On a Patch: Step by Step
Step 1: Prepare the Surface
Set up your ironing board or lay two folded towels on a firm table. The padding matters because it allows pressure to distribute evenly across the entire patch surface. Pressing on a bare hard surface reduces contact and weakens the bond before it even starts.
Step 2: Heat the Iron with No Steam
Turn steam off completely. Moisture interferes with the thermoplastic adhesive and prevents it bonding cleanly to the fabric.
Give the iron a full two to three minutes to reach its maximum temperature before you touch anything. An iron that hasn't fully heated up is one of the most common reasons patches fail on the first attempt.
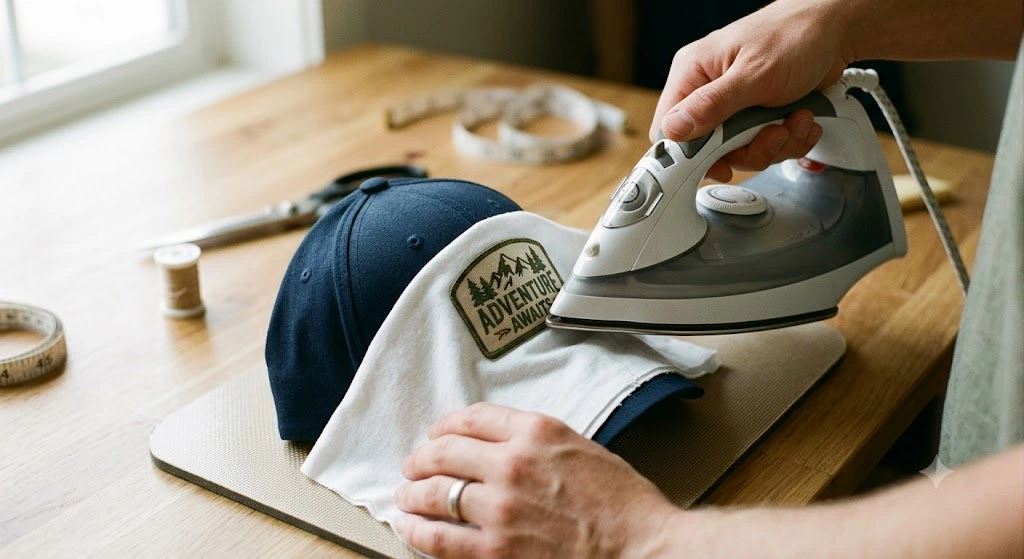
Step 3: Pre Warm the Fabric
Lay the garment flat and smooth, right side up. Place your press cloth over the spot where the patch will sit. Press the hot iron firmly over the press cloth for 15 to 20 seconds.
This step is almost universally skipped and almost universally responsible for edges that lift. Warm fabric activates the adhesive faster and more evenly, producing a significantly stronger bond.
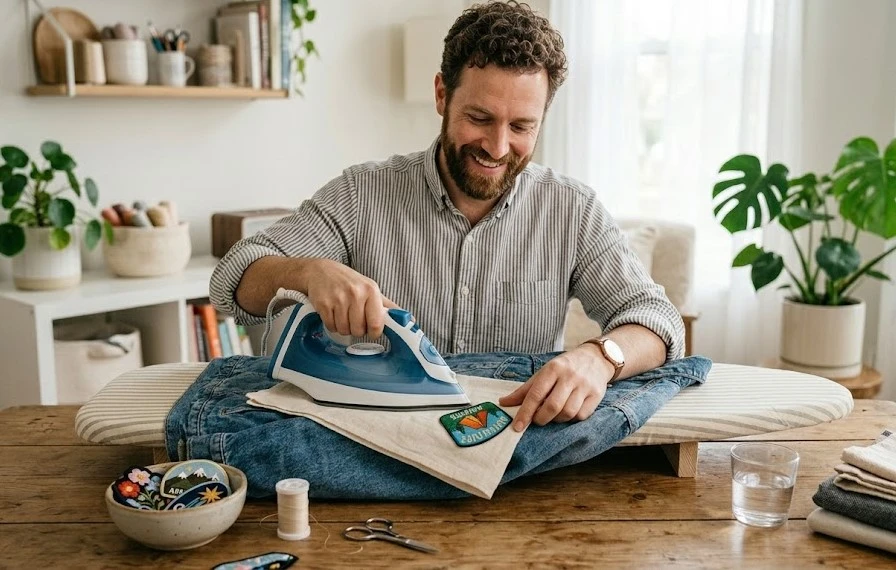
Step 4: Position the Patch
Set the iron aside safely. Remove the press cloth. Place your patch exactly where you want it, adhesive side down, face side up.
If the patch needs to be perfectly centred on the back of a hoodie or the chest of a shirt, measure and mark with a fabric marker before this step. Once heat activated adhesive touches warm fabric, it begins to bond. Repositioning a partially bonded patch leaves residue and rarely goes cleanly.
Step 5: Press Firmly for 60 Seconds Without Moving
Lay the press cloth back over the patch. Place the iron directly over the patch and press straight down with firm, even pressure for a full 60 seconds.
Do not slide the iron. Do not rock it. Do not lift and reposition it mid press. Moving the iron while the adhesive is activating shifts the patch and smears the glue unevenly across the fabric. The result is a crooked patch, an uneven bond, and adhesive residue on the garment.
Press and hold. Nothing else.
Step 6: Press Again for Another 60 Seconds
Lift the iron, keep the press cloth in place, and press again in exactly the same position for another full minute.
Two 60 second presses is the reliable standard for a lasting bond. One press is rarely enough, particularly on thicker fabrics like denim or canvas, or when working with larger custom embroidered patches where the adhesive layer needs longer to heat through evenly to every edge.
Step 7: Check Every Edge
Remove the press cloth and gently touch each corner and edge of the patch. Do not peel.
If any edge feels loose or lifts slightly under light pressure, cover it and press again for 60 seconds. Repeat until the entire patch feels firmly set against the fabric.
Step 8: Press from the Back
Flip the garment over so the reverse side faces up. Press the iron directly onto the back of the fabric over the patch area for another 60 seconds.
This is the step most guides leave out entirely, and it makes a measurable difference to longevity. Pressing from the reverse pushes the adhesive deeper into the fabric fibres from the opposite direction, strengthening the bond significantly.
A patch pressed only from the front lasts weeks. A patch pressed from both sides lasts years.
Step 9: Leave It Flat for 10 Minutes
The adhesive is still soft and slightly mobile immediately after pressing. Folding, stretching, or wearing the garment before it has cooled can cause the patch to shift or the edges to lift.
Ten minutes flat on the surface costs nothing. Skipping those ten minutes sometimes costs the whole application.
Mistakes That Ruin the Bond
Using steam is the single biggest error. It actively works against the adhesive.
Pressing on a bare table without padding reduces contact pressure. Moving the iron mid press smears the adhesive. Pulling the garment off the board before it cools is how a perfectly bonded patch becomes a peeling edge by morning.
Pressing only once, particularly on thick fabric, leaves a bond that feels secure but fails within a few washes.
Does Patch Type Change the Process?
For standard iron on patches, the method above applies in full.
Custom embroidered patches on thick fabrics such as denim jackets or canvas bags benefit most from the full double press technique plus the reverse press. The depth of the embroidery means the adhesive layer sits further from the fabric surface and needs more heat time to penetrate properly.
Custom sublimation shirts with iron on backing, popular with sports teams across London, Leeds, and Liverpool, often use a polyester blend base fabric. Polyester handles heat differently to cotton. Use the highest heat setting your garment's care label allows, and always test on a hidden seam first. The process is otherwise identical.
For customers ordering through StitchKrafts UK, whether it's custom vector art services for a new logo design or a full run of custom embroidered patches for a club or business, every order comes with specific application instructions matched to the patch type and recommended backing fabric. That removes the guesswork entirely.
Aftercare: Keeping It Looking Good
Turn the garment inside out before every wash. Use a cool or warm cycle, never hot. Avoid tumble drying on high heat, which softens adhesive over time and causes edges to lift.
For patches on high use items like bags, jackets, or workwear, adding a few hand stitches around the border extends the life considerably and keeps everything sitting flat.
Follow the process correctly and that patch will outlast the garment it's pressed onto.