Adding a Name Tape Alongside a Sewn Patch Neatly
Quick answer: Decide the layout before you sew. Put the patch and the name tape on the same straight line, leave a gap of about 1 to 2 centimetres between them, and keep both at least 1 centimetre away from any seam. Sew the bigger patch first, then fit the name tape to it. That keeps everything straight and tidy.
Most people sew the patch, then squeeze in the name tape wherever there is room. That is why so many uniforms end up looking a bit crooked. This guide shows you how to plan it first, so both pieces look like they belong together.
The Golden Rule: Plan Before You Sew
A name tape and a patch do two different jobs. The name tape says who you are. The patch says what you belong to, like a school, a club, or a team.
Because they say different things, they work best when people can read them in a clear order. Usually the patch is bigger and comes first. The name tape is smaller and sits next to it, or just below it.
If you plan this before you pick up a needle, the sewing is easy. If you do not, you end up unpicking stitches.
What You Need
A ruler or tape measure. A washable fabric pen or a bar of tailor's chalk. Pins or clips. A needle. Thread in the right colours. Small scissors. And an iron, to flatten the fabric before you start.
If you have some iron on stitch tape, it is handy for holding things in place. But pins work fine.
Step 1: Wash and Iron the Clothes First
New cotton can shrink the first time you wash it. If you sew first and wash later, the cloth shrinks under the patch, and the patch bunches up.
So wash and dry the item first. Then iron the spot where the pieces will go. Ironing takes out the little wrinkles, so you do not sew them in forever.
Step 2: Use the Spacing Blueprint
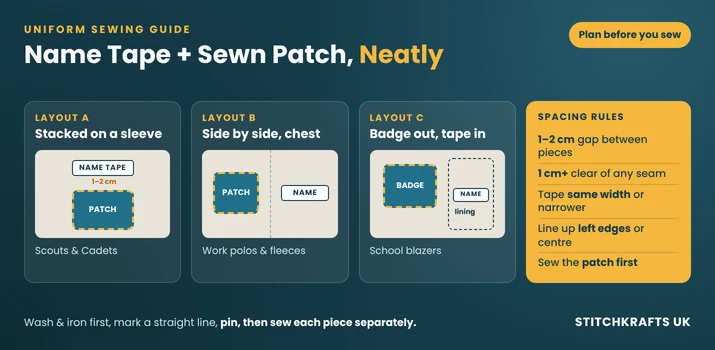
Here are simple rules that make the layout look neat. These are rules of thumb, so adjust them to suit your uniform.
| What to Check | A Good Rule |
|---|---|
| Gap between the patch and the name tape | About 1 to 2 centimetres |
| Distance from any seam | At least 1 centimetre |
| Name tape width compared to the patch | Same width, or a little narrower |
| Alignment | Line up the left edges, or centre both |
| Position | Straight lines, checked with a ruler |
The gap matters most. Too close, and the two pieces look crowded and blur together. Too far, and they look like strangers.
Step 3: Pick Your Layout
Here are three layouts that work well. Choose the one that matches your clothes.

Layout A: Stacked on a sleeve. This is common on Scout and Cadet uniforms. The name tape sits on top, and the badge sits just below it, with a small gap between them.
Layout B: Side by side on the chest. This is common on work polos and fleeces. The patch sits on the left chest, and the name tape sits on the right.
Layout C: Name tape inside, patch outside. This is common on school blazers. The badge sits on the outside, over the breast pocket. The name tape goes inside, on the lining or the neck, so it does not clutter the front. Sew the tape to the label or lining only, and keep your stitches off the outer cloth.
Whichever layout you choose, check your school, club, or workplace rules first. Some uniforms have set places for badges and name tapes.
Step 4: Measure and Mark
Lay the clothes flat on a table. Do not hold them in your lap, because the fabric can drag and throw your lines off.
Use your ruler and washable pen to mark a straight guide line where the pieces will go. For a stacked layout, draw a faint vertical line. For a side by side layout, draw a faint horizontal line.
Then mark small dots where each corner of the patch and the name tape will sit. Step back and look. If it feels off, rub it out and try again. A pen mark costs nothing. A crooked stitch costs a lot.
Step 5: Pin It Before You Sew
Place the patch first, using your marks. Pin it at all four corners.
Now place the name tape. Check the gap with your ruler. Pin it at all four corners too.
Look at it from a few steps away. Squint a little. If it looks straight, you are ready.
Step 6: Sew the Patch First, Then the Name Tape
Always sew the bigger piece first. It sets the layout, and the name tape fits to it. If you do it the other way, the tape can pull the layout out of line.
For the patch: Use thread that matches the border. Double it up for strength. Sew small stitches, about 3 to 5 millimetres apart, all the way around the edge. Add two or three extra stitches at each corner. Tie off on the inside.
For tips on neat, even stitches, see our guide to sewing a patch on without puckering, or follow the same steps you would use on a sleeve.
For the name tape: Use thread that matches the tape, so the stitches almost disappear. If the ends of the tape are raw, fold them under about 5 millimetres, and press them flat to stop fraying. Sew along the top and bottom edges with small, close stitches. Then sew the two short ends.
Use a separate piece of thread for each. Do not carry a thread across the gap from one piece to the other. A stitch crossing the gap will show, and it will pull the fabric when you wear it.
Step 7: Sew It, Do Not Just Iron It
Many name tapes come with an iron on backing. It is quick, but over time it can peel in the wash. One parent describes iron on tapes as taking almost as long to apply as sewing, and eventually coming off.
A good middle path is to use the iron on backing to hold the tape in place, then sew around the edges for a permanent finish. You get a flat, straight tape, and thread that keeps it there.
Step 8: Check the Back and Fix Mistakes
Turn the clothes inside out. Your stitches should look small and tidy. If you see big loops, or the fabric looks bunched, fix it now.
- Crooked tape: Unpick a few stitches and move it. Do not try to straighten it by pulling.
- Ripples in the fabric: The thread is too tight. Unpick that section and sew it again, a little looser.
- Tape too long: Fold the extra under at the ends and press it flat.
- Tape and patch too close: Move the tape. A cramped layout never looks smart.
Keep Them Looking Good
Two sewn pieces make the fabric a bit stiffer in that spot. Wash the clothes inside out, on a cold, gentle setting. Skip the tumble dryer where you can, since heat can shrink fabric and pull on the stitches. Check the corners every few weeks, and add a stitch if one starts to lift.
Choosing a Patch That Sits Well
If your badge has a thick, raised border, it will look more dramatic next to a flat name tape. A classic embroidered patch works well for school and club badges, and its stitched edge is easy to sew around. If your badge has tiny words, like a motto or a year, a woven patch can show that small text clearly.
Common Mistakes to Avoid
Sewing the patch first, then squeezing in the name tape. Sewing across a seam. Skipping the ruler and relying on your eye. Forgetting to wash the clothes first. Letting a thread cross the gap between the pieces. Using bright, contrasting thread on the name tape. And pulling stitches too tight.
Frequently Asked Questions
How do you sew a name tape next to a patch?
Plan the layout first, mark a straight line, and leave a gap of about 1 to 2 centimetres. Sew the patch first, then the name tape.
Which goes first, the patch or the name tape?
The patch, since it is bigger and sets the layout. The name tape fits next to it.
How far apart should a patch and a name tape be?
About 1 to 2 centimetres works well. Closer looks crowded, and further looks disconnected.
Should I iron on or sew on a name tape?
Sewing lasts longest. Iron on tapes can peel over time, so many people press them on to hold them, then sew the edges.
Can I put a name tape and a patch on a school blazer?
Yes. Many people sew the badge on the outside and the name tape on the inside lining or label. Check your school's uniform rules.
How do I stop the tape and patch from puckering the fabric?
Wash and iron the clothes first, keep your stitches small, and do not pull the thread too tight.
Need a Patch for Your Uniform?
If you need a badge made to match your school, club, or team, our custom patches can be made in your own size, shape, and colours. Tell StitchKrafts UK what the uniform is for, and we will help you pick a patch that sits neatly alongside a name tape. We work with schools, clubs, and businesses in London, Birmingham, and across the country.