

How to Apply a Velcro Patch to a Tactical Bag
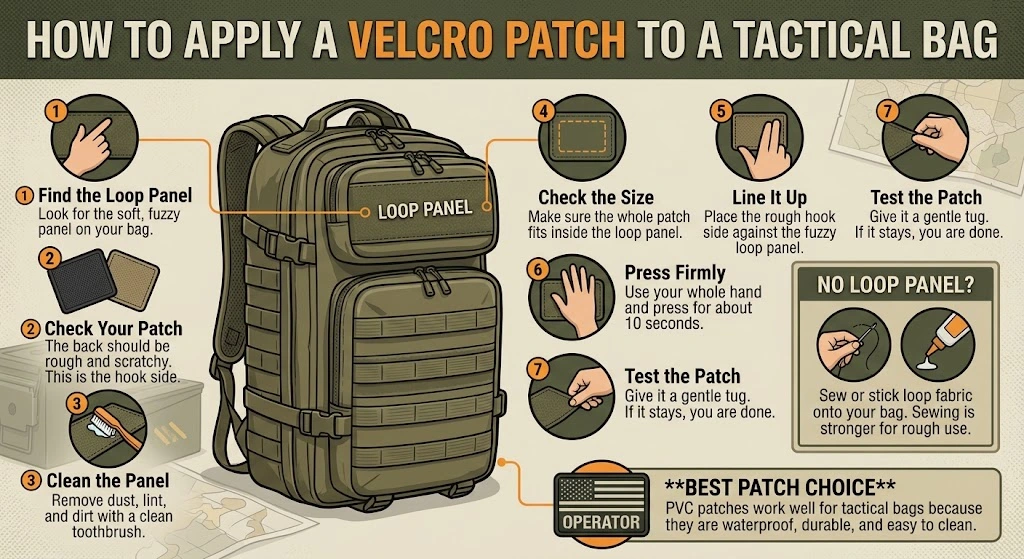
Quick answer: Find the soft, fuzzy panel on your bag, line up your patch so the rough side faces it, and press hard for about ten seconds. If your bag has no fuzzy panel, sew or stick one on first. Then give the patch a gentle tug to check it holds.
Velcro patches are one of the easiest patches to use. You do not need a needle, an iron, or any glue. But a few small mistakes can make your patch fall off in the middle of a trip. This guide shows you how to get it right the first time.
The Short Version: 5 Quick Steps
- Find the fuzzy panel on your bag. This is called the loop side.
- Check your patch. The back should feel rough and scratchy. This is called the hook side.
- Line it up. Make sure the whole patch fits inside the fuzzy panel.
- Press hard for ten seconds, using your whole hand.
- Tug it gently to test it. If it holds, you are done.
That is the quick way. If you want to know why each step matters, and what to do when something goes wrong, keep reading.
The Long Version: Every Step Explained
Step 1: Learn the Two Sides
Velcro works with two different sides that grab each other.
The hook side is rough and scratchy. It has tiny plastic hooks, a bit like very small fishing hooks. This side is on the back of your patch.
The loop side is soft and fuzzy. It has tiny loops, and the hooks grab onto them. This side goes on your bag.
Here is a fun fact. Velcro is really a brand name. The proper name is hook and loop. People say Velcro for everything, a bit like saying Band-Aid instead of plaster.
Hook sticks to loop. But hook does not stick to hook, and loop does not stick to loop. So if your patch has a soft back, it will not stick to a soft panel. Always check which side is which before you start.
Step 2: Find the Loop Panel on Your Bag
Look at the front of your bag. You are looking for a rectangle of soft, fuzzy fabric. Many tactical backpacks have one on the front, on the sides, or on the top handle.
Run your finger over it. If it feels soft and fuzzy, that is your loop panel. If it feels smooth, hard, or like normal bag fabric, it is not.
Some bags have a few small panels. Others have one big one. A big panel gives you more room, so you can fit more patches.
Step 3: What If Your Bag Has No Loop Panel?
Lots of bags do not come with one. That is okay. You can add your own.
You can buy a strip of loop fabric from a craft shop or online. Then you have two ways to put it on.
Option A: Sew it on. This is the strongest way. Use strong thread and sew all the way around the edge of the panel. Sewing lasts for years, and it handles rain, heat, and rough use.
Option B: Stick it on. Some loop strips have sticky backs. Peel off the paper and press it onto the bag. This is quick, but it is not as strong. Sticky glue can let go in hot weather, like a bag left in a car on a sunny day. It also does not stick well to waterproof, shiny bag fabric.
For a tactical bag that will see rough use, sewing is almost always the better choice.
Step 4: Clean the Panel First
This step is easy to skip, but it matters. Dust, lint, and little bits of dirt can clog the loops, and then the hooks cannot grab them.
Brush the loop panel with a clean, dry toothbrush. Brush in all directions to pull out any bits stuck inside. If there is mud, wipe it off and let it dry fully first.
A clean panel holds much better than a dirty one.
Step 5: Check That Your Patch Fits
Your whole patch needs to sit inside the loop panel, with a little space to spare around the edges.
If the patch hangs over the edge of the panel, the part that hangs over has nothing to grab. Those edges will curl up, catch on things, and collect dirt. Soon the whole patch peels off.
If your patch is too big for the panel, you have two choices. Pick a smaller patch, or add a bigger loop panel.
Step 6: Line Up and Press
Hold the patch with the rough side facing the fuzzy panel. Move it around until it looks straight. Look at it from a bit further back before you press, since it is easy to be a little crooked.
Now press down firmly. Use your whole palm, and push for about ten seconds. Press the middle first, then the corners and edges.
Pressing hard matters. The hooks need to push deep into the loops to grab on tight. A light tap will not do it.
Step 7: Test It With a Gentle Tug
Hold the edge of the patch and pull gently. It should stay on. If it peels away easily, press it down again for longer.
If it still will not stay, check these things. Is the panel dirty? Is it worn out and flat? Is the patch too big for the panel? Fixing one of these usually solves it.
Step 8: Look After It
Velcro patches need a little care to last.
Every few weeks, brush the loop panel and the back of the patch with a toothbrush to get out lint. If your hooks look clogged, press a piece of strong tape against them and pull it off. This pulls the lint out.
When you take a patch off, peel it slowly from one corner. Do not rip it, since this can wear out the loops.
If you swap patches often, keep your spare patches stuck onto a spare piece of loop fabric. This stops the hooks from catching on other things in your drawer.
Why PVC Patches Work So Well on Tactical Bags
Tactical bags go outside a lot. They get wet, muddy, and dusty. This is why many people choose PVC patches with hook backing.
PVC is a soft, rubbery material. It does not soak up water, so rain just rolls off. Mud wipes away with a damp cloth. The colours stay bright in the sun because the colour is part of the material itself.
One small thing to remember. PVC patches can be heavier than fabric ones. If you put a very big, thick PVC patch on a small loop panel, its weight can pull it loose. Match the size of the patch to the size of the panel, and it will stay on.
Picking the Right Size and Where to Put It
On a tactical backpack, patches usually go in a few spots.
The front panel is the biggest space, so it suits larger patches. The side panels are good for smaller ones. The top handle area works for tiny patches only.
A good rule is to leave about half a centimetre of loop panel showing around your patch. Too tight, and the edges will not grip. Too loose, and the patch looks lost.
Common Mistakes to Avoid
Putting a soft backed patch on a soft panel. They will not stick. Skipping the cleaning step, so the loops are full of lint. Using a patch that is bigger than the panel. Pressing too lightly and not for long enough. Using sticky loop tape on a bag that gets very hot or very wet. And ripping patches off quickly, which wears the loops out.
Frequently Asked Questions
How do you put a Velcro patch on a tactical bag?
Find the soft, fuzzy loop panel on the bag, line up your patch with the rough side facing it, and press firmly for about ten seconds.
What if my tactical bag has no Velcro panel?
You can sew or stick a strip of loop fabric onto the bag. Sewing lasts longer, especially in rain, heat, and rough use.
Why does my Velcro patch keep falling off?
The most common reasons are a dirty panel, a worn out panel, a patch that is too big for the panel, or not pressing hard enough.
Can I wash a Velcro patch?
Yes. Wipe it with a damp cloth and let it dry fully. Brush out any lint from the hooks with a toothbrush before putting it back on.
Is sticky loop tape strong enough for a tactical bag?
It works for light use, but heat and water can weaken the glue. Sewing the panel on is much more reliable.
Can I add Velcro to a patch that does not have any?
Yes. You can sew a hook backing onto the back of the patch, then attach it to a loop panel on your bag.
Need Patches Made for Your Gear?
Our custom patches can be made with hook backing, ready to press onto any loop panel. Whether you are in Houston or anywhere else in the country, StitchKrafts USA can help you pick the right size and material for your bag before you order.