

How Do You Hand Sew a Patch on a Shirt So It Actually Lasts?
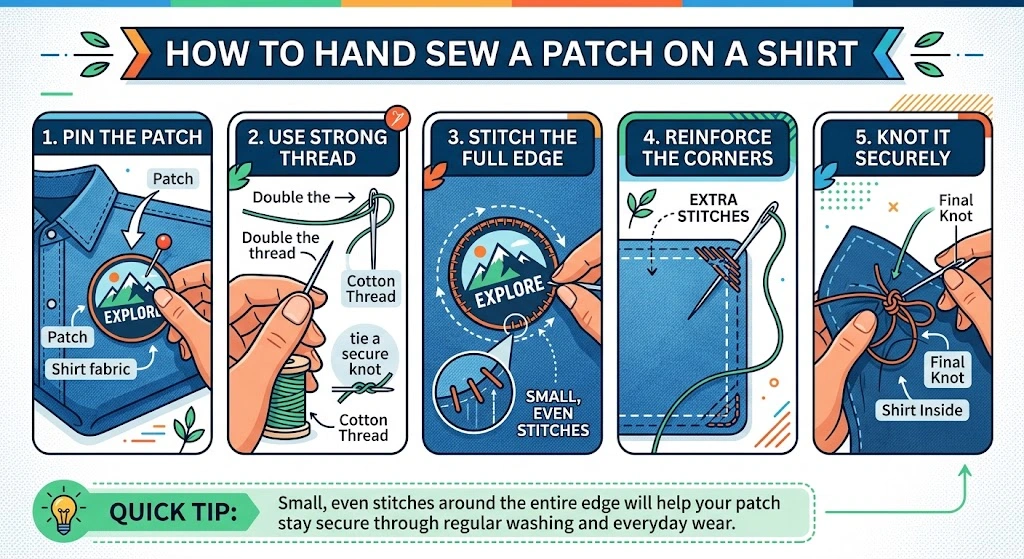
Quick answer: To sew a patch on a shirt you have to pin it at the place first, use a strong doubled thread, stitch around the entire edge with small even stitches, and knot it off securely on the inside. Skipping any of these steps is usually why patches come loose after a few washes.
Sewing a patch on sounds simple, and it is, but most people who mess it up aren't bad at sewing. They just skip a step they didn't realise mattered. Here's a straightforward checklist to make sure yours holds up wash after wash.
Before You Start: Ask Yourself These Questions
What type of patch are you working with?
Embroidered patches, woven patches, and custom jean patches all sew on the same basic way, but thicker patches, like PVC, need a slightly stronger needle and thread to get through the material cleanly.
What type of shirt is it going on?
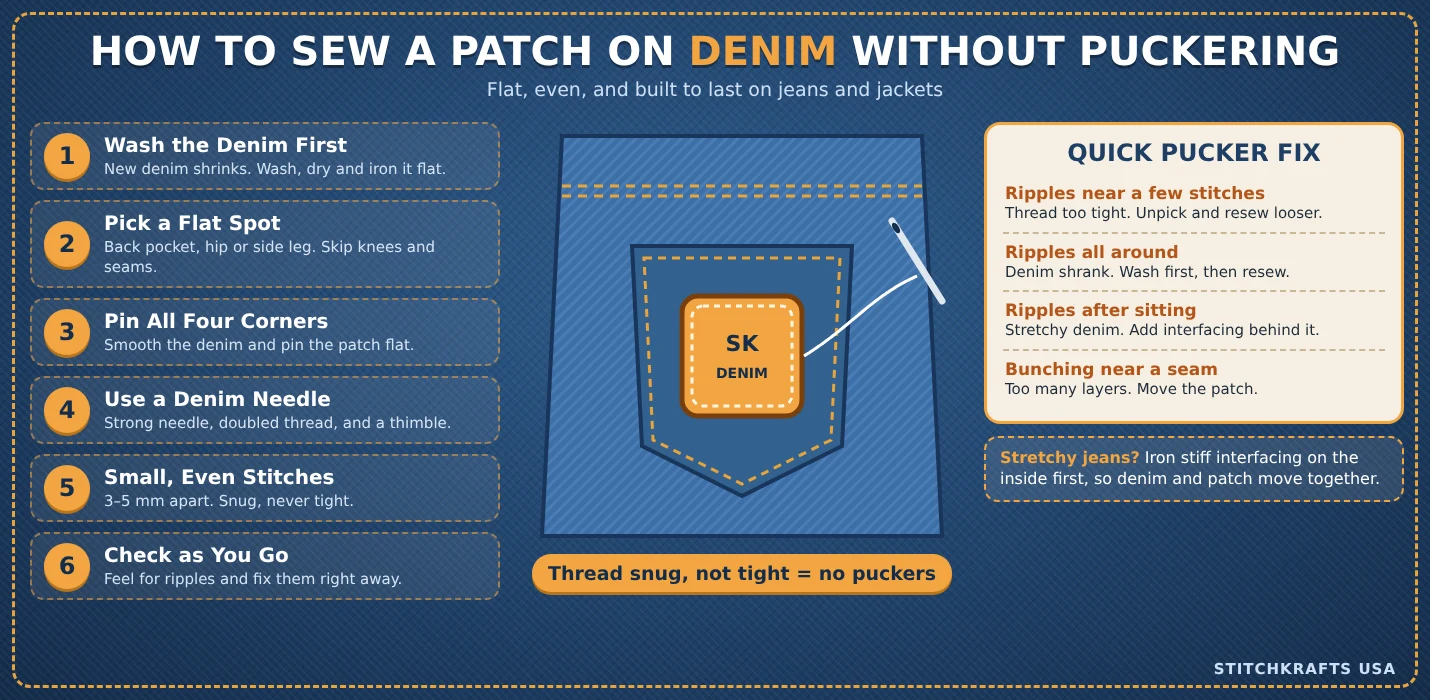
Cotton and denim hold stitches well. Thin or stretchy fabric needs smaller, closer stitches so the patch doesn't pull or pucker once it moves with the fabric.
Do you want it removable later, or permanent?
If you might want to take it off one day, a lighter stitch works. If it's going on a jean jacket or work shirt for the long haul, go with a tighter, more reinforced stitch from the start.
Once you know the answers, the actual sewing is easy to get right.
Step 1: Position and Pin the Patch First
Never sew freehand. Lay the shirt flat, place the patch exactly where you want it, and pin it down at all four corners, or more if the patch is larger or an unusual shape.
Check it from a distance before committing to a single stitch. It's much easier to reposition a pin than to unpick stitching later.
Step 2: Thread Your Needle the Right Way
Use a strong thread, ideally one that matches or closely blends with the patch's border colour. Doubling the thread before you start gives noticeably more strength than sewing with a single strand, especially for a patch that's going to see regular washing.
Tie a secure double knot at the end so it doesn't slip through the fabric on your first stitch.
Step 3: Stitch Around the Entire Edge, Not Just the Corners
This is the step people skip most often, and it's the main reason patches come loose. Stitching only the four corners might hold for a wash or two, but the middle sections of the edge will start lifting fast.
Instead, work your way slowly around the whole border. A simple whip stitch, going over the edge and back through from underneath, works well for most patches. Keep your stitches small and close together, roughly 3 to 5 millimetres apart, and keep the tension even so the patch lies flat rather than puckering.
Step 4: Reinforce the Corners
Corners take the most strain over time, especially on jean jackets and everyday shirts that get pulled on and off often. Once you've gone all the way around, double back over each corner with two or three extra stitches for a bit of added strength exactly where it's needed most.
Step 5: Knot It Off Properly on the Inside
When you've finished the full loop, finish with a secure knot on the inside of the fabric, not the outside. Trim the thread close to the knot so there's nothing hanging loose that could catch or unravel later.
A Quick Checklist Before You Call It Done
Pin placement checked from a distance. Thread doubled and knotted securely. Full edge stitched, not just corners. Corners reinforced with extra stitches. Final knot tied on the inside, not the outside. Loose threads trimmed neatly.
If you can tick off all six, the patch should hold up through regular washing and everyday wear without needing repairs.
What About Sublimated or Printed Patches?
Dye sublimation shirts and sublimated patches are usually a bit thinner and more flexible than embroidered or PVC patches, which actually makes them easier to hand sew. The same steps apply, just be gentle with tension since the fabric can be a little more delicate around the edges.
Common Mistakes That Make Patches Fall Off Early
Using a single strand of thread instead of doubling it. Only stitching the corners instead of the full edge. Pulling stitches too tight, which causes puckering and weak points. Not reinforcing corners on patches that go on jackets or high movement areas like jean patches on the knee or pocket. Skipping a proper knot and just tucking the thread through instead.
Avoiding these is really the whole game when it comes to sewing a patch without mistakes.
Frequently Asked Questions
Do I need special thread to sew a patch onto denim?
Not necessarily special thread, but a strong, doubled thread makes a real difference on denim, since the fabric takes more strain over time than lighter shirts.
Can I hand sew a PVC patch, or does it need a machine?
PVC patches can be hand sewn. Most come with small pre punched holes around the edge made specifically for this, so a hand needle goes through easily.
How do I stop my stitches from looking uneven?
Keep your spacing consistent, roughly 3 to 5 millimetres apart, and try to keep the same tension throughout rather than pulling some stitches tighter than others.
Is hand sewing strong enough for jean patches that get washed a lot?
Yes, as long as the full edge is stitched and the corners are reinforced. A properly hand sewn patch holds up just as well as a machine sewn one for everyday wear.
What's the difference between sewing a patch on a t-shirt versus a jean jacket?
Denim can take a slightly tighter, more reinforced stitch since the fabric is thicker and more durable. Lighter shirt fabric needs a gentler touch to avoid puckering.
Need Patches Made Before You Start Sewing?
If you're in Austin, Los Angeles, or anywhere else across the US and need patches made before you start sewing, StitchKrafts USA is a patches design company that creates embroidered, PVC, and custom jean patches built to hold up to hand sewing and everyday wear.