

How to Sew a Patch on Jeans Without Making a Mess of It
Jeans are forgiving. Denim is tough. And a patch sewn on properly will outlast the jeans themselves. Here is exactly how to do it.
The Thing About Jeans That Makes This Easier Than You Think
Denim is probably the best fabric in your wardrobe for sewing patches onto.
It is thick enough to hold a stitch firmly. It does not stretch or shift while you work. The weave is dense enough that your thread grips properly on every pass. And a patch on denim looks intentional in a way that patches on thinner fabrics sometimes do not.
Whether you are covering a hole in your favourite pair, decorating a clean pair with custom patches from StitchKrafts USA, or adding woven patches to a pair of jeans you want to make completely your own, the same method works every time. This guide walks through it in plain, simple steps with no assumptions about your sewing experience.
Quick Answer
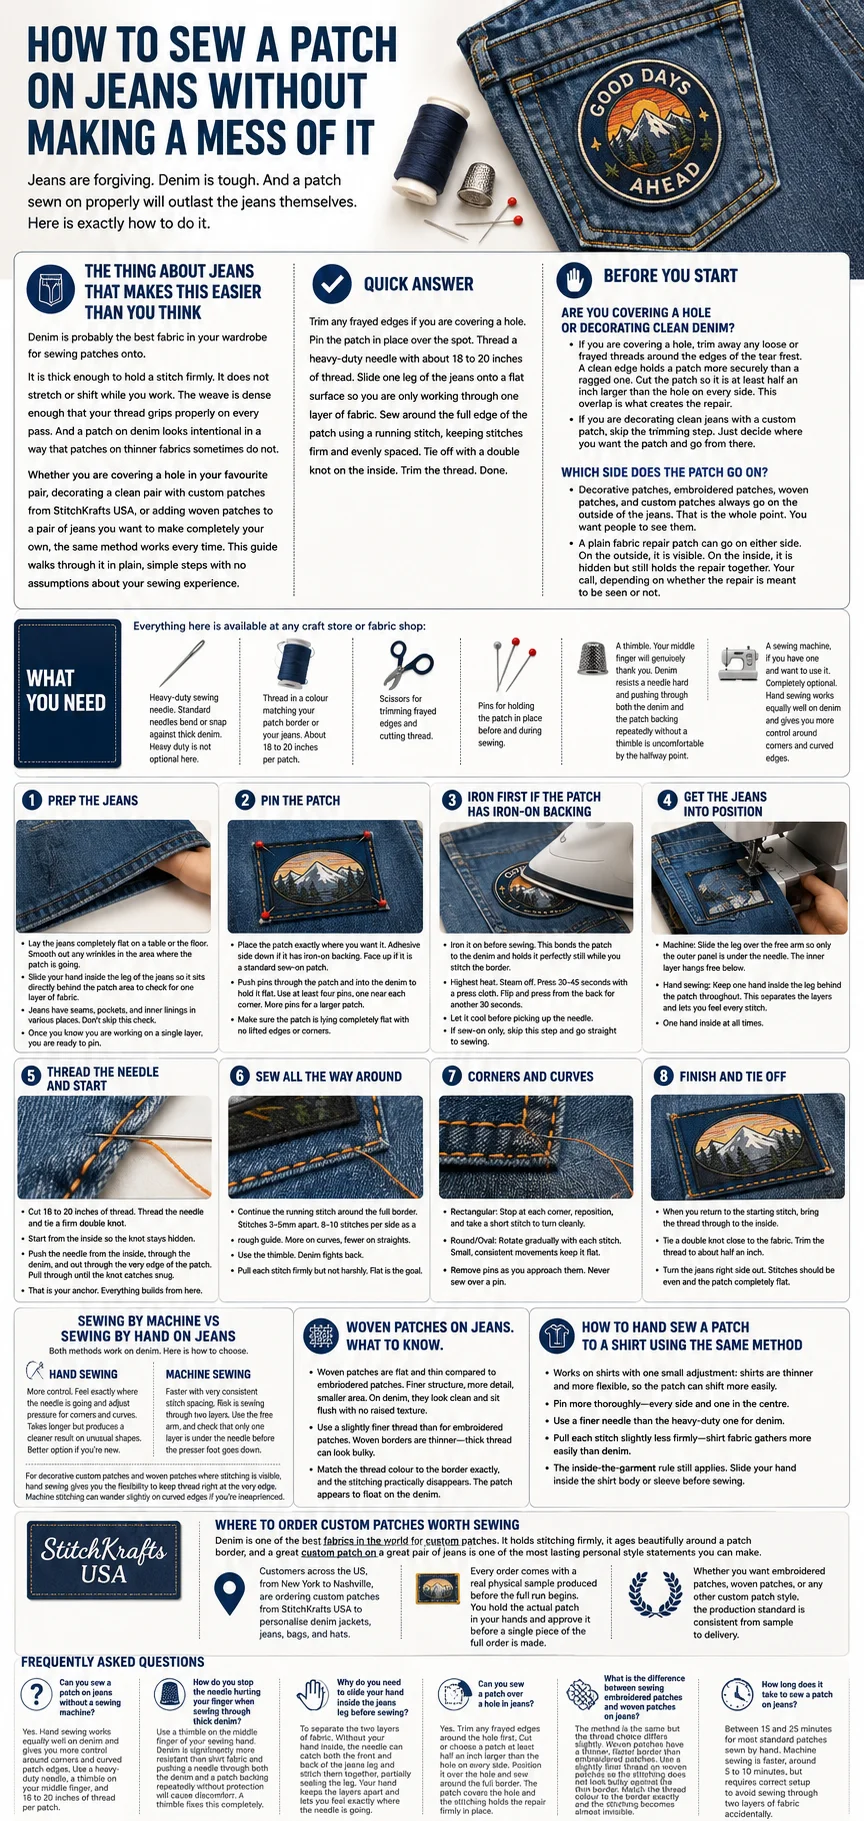
Trim any frayed edges if you are covering a hole. Pin the patch in place over the spot. Thread a heavy-duty needle with about 18 to 20 inches of thread. Slide one leg of the jeans onto a flat surface so you are only working through one layer of fabric. Sew around the full edge of the patch using a running stitch, keeping stitches firm and evenly spaced. Tie off with a double knot on the inside. Trim the thread. Done.
Before You Start
Are You Covering a Hole or Decorating Clean Denim?
If you are covering a hole, trim away any loose or frayed threads around the edges of the tear first. A clean edge holds a patch more securely than a ragged one. Cut the patch so it is at least half an inch larger than the hole on every side. This overlap is what creates the repair.
If you are decorating clean jeans with a custom patch, skip the trimming step. Just decide where you want the patch and go from there.
Which Side Does the Patch Go On?
Decorative patches, embroidered patches, woven patches, and custom patches always go on the outside of the jeans. That is the whole point. You want people to see them.
A plain fabric repair patch can go on either side. On the outside, it is visible. On the inside, it is hidden but still holds the repair together. Your call, depending on whether the repair is meant to be seen or not.
What You Need
Everything here is available at any craft store or fabric shop:
- A heavy-duty sewing needle. Standard needles bend or snap against thick denim. Heavy duty is not optional here.
- Thread in a colour matching your patch border or your jeans. About 18 to 20 inches per patch.
- Scissors for trimming frayed edges and cutting thread.
- Pins for holding the patch in place before and during sewing.
- A thimble. Your middle finger will genuinely thank you. Denim resists a needle hard and pushing through both the denim and the patch backing repeatedly without a thimble is uncomfortable by the halfway point.
- A sewing machine, if you have one and want to use it. Completely optional. Hand sewing works equally well on denim and gives you more control around corners and curved edges.
Step 1. Prep the Jeans
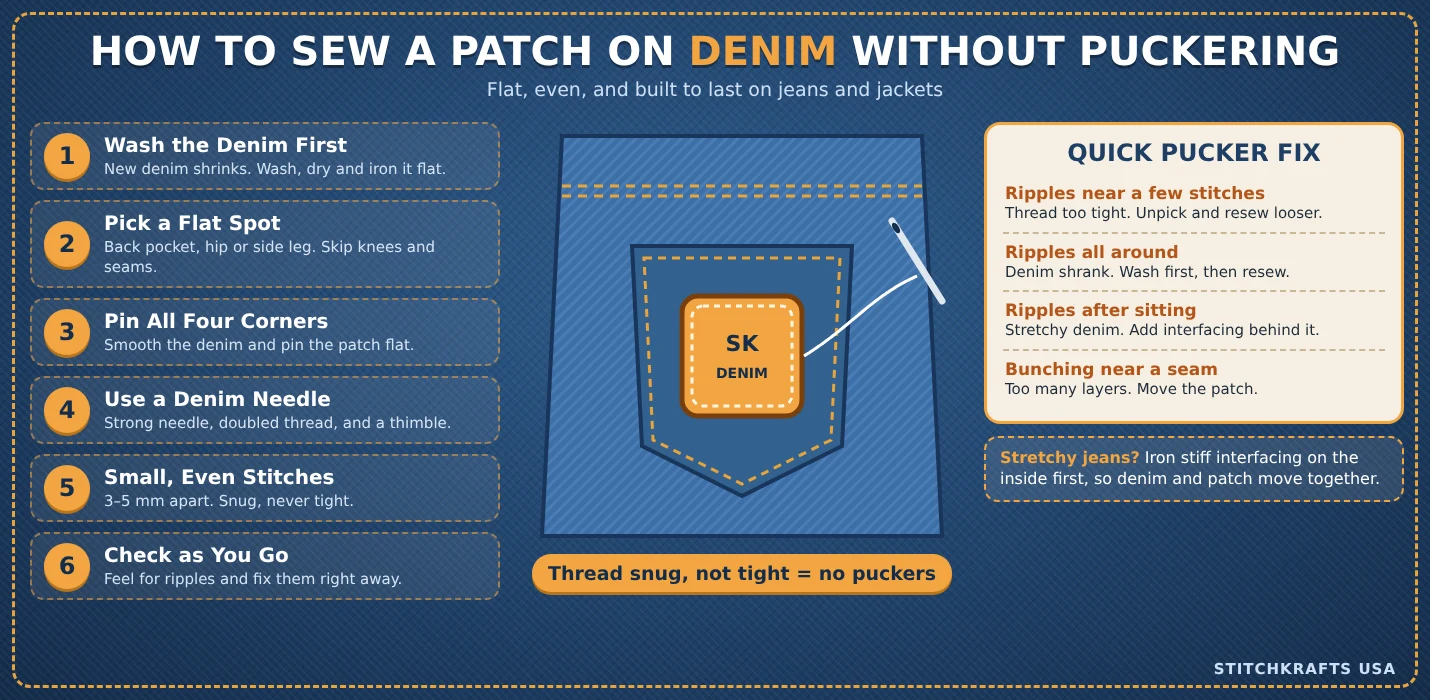
Lay the jeans completely flat on a table or the floor. Smooth out any wrinkles in the area where the patch is going.
Now do this one thing that most people miss. Slide your hand inside the leg of the jeans so it sits directly behind the patch area. This tells you immediately whether there is one layer of fabric or two at the spot you are working on.
Jeans have seams, pockets, and inner linings in various places. If you sew without checking, you can accidentally stitch through two layers of denim and sew the leg partially shut, or attach the outer panel to a pocket behind it. Neither of these can be fixed without unpicking everything and starting again.
Once you know you are working on a single layer, you are ready to pin.
Step 2. Pin the Patch
Place the patch exactly where you want it. Adhesive side down if it has iron-on backing. Face up if it is a standard sew-on patch.
Push pins through the patch and into the denim to hold it flat. Use at least four pins, one near each corner, for a standard rectangular or circular patch. More pins for a larger patch.
Make sure the patch is lying completely flat with no lifted edges or corners. A patch that bubbles or lifts before sewing will bubble and lift after sewing too.
Step 3. Iron First If the Patch Has Iron-On Backing
If your patch has a heat seal backing, iron it on before sewing. This bonds the patch to the denim and holds it perfectly still while you stitch the border.
Set the iron to its highest heat setting. Steam off completely. Press straight down for 30 to 45 seconds with a press cloth between the iron and the patch. Flip the jeans over and press from the back for another 30 seconds.
Let it cool before picking up the needle.
If the patch is sew-on only with no adhesive backing, skip this step and go straight to sewing with the pins holding everything in place.
Step 4. Get the Jeans into Position
Before the needle goes anywhere, set up the jeans correctly.
If you have a sewing machine with a free arm, slide the jeans leg over the narrow arm so only the outer panel of fabric sits under the needle. The inner layer hangs free below. This prevents you from stitching the leg shut.
If you are hand sewing, slide one hand inside the leg and position it behind the patch. Keep your hand there throughout the sewing process. This separates the fabric layers and lets you feel exactly where the needle is going on every stitch.
This step matters just as much on jeans as it does when sewing a patch on a sleeve. The leg of a pair of jeans is a tube exactly like a sleeve. The same risk applies. One hand inside at all times.
Step 5. Thread the Needle and Start
Cut 18 to 20 inches of thread. Thread the heavy-duty needle. Tie a firm double knot at the loose end.
Start from the inside of the jeans so the knot sits hidden against the inner surface of the denim.
Push the needle from the inside, through the denim, and out through the very edge of the patch. Pull the thread through until the knot catches snug against the inside of the jeans.
That is your anchor. Everything builds from here.
Step 6. Sew All the Way Around
Continue the running stitch around the full border of the patch.
Push the needle back down through the patch edge and through the denim. Pull the thread through to the inside. Bring the needle back up from inside through the denim and out through the patch edge. Pull firmly after every stitch.
Keep stitches about 3 to 5mm apart. Even spacing makes the result look clean and deliberate.
For hand sewing, use 8 to 10 stitches along each side of the patch as a rough guide for spacing. More stitches on curved edges, fewer on straight ones.
Use the thimble. Every push through both the patch backing and the denim requires real force. The thimble on your middle finger gives you the pressure you need without turning your fingertip raw by the third side.
Pull each stitch firmly but not harshly. Firm enough to sit flat and snug. Not so tight that the denim puckers and gathers around the patch. Flat is the goal throughout.
Step 7. Corners and Curves
If the patch is rectangular, stop at each corner, reposition the needle, and take a short stitch to turn the corner cleanly. One good short stitch at a corner sits flatter than trying to curve a longer stitch around it.
If the patch is round or oval, rotate it gradually with each stitch. Small consistent movements keep the patch lying flat all the way around a curved edge.
Remove pins as you approach them. Never sew over a pin. Pull each one out just before the needle would hit it.
Step 8. Finish and Tie Off
When you have gone all the way around and arrived back at the starting stitch, bring the thread through to the inside of the jeans.
Tie a double knot close to the fabric. Trim the thread to about half an inch from the knot.
Turn the jeans right side out and look at the patch from the outside. The stitching should run evenly around the full border. The patch should lie completely flat against the denim with no gathering or puckering around it.
Sewing by Machine vs Sewing by Hand on Jeans
Both methods work on denim. Here is how to choose.
Hand Sewing
Hand sewing gives you more control. You can feel exactly where the needle is going and adjust pressure for corners and curves as you go. It takes longer but produces a cleaner result on patches with unusual shapes. It is also the better option if you are new to this.
Machine Sewing
Machine sewing is faster and produces very consistent stitch spacing. The risk on jeans specifically is accidentally sewing through two layers of fabric. Slide the jeans correctly over the free arm before you start and check that only one layer is under the needle before the presser foot goes down.
For decorative custom patches and woven patches where the stitching will be visible, hand sewing gives you the flexibility to keep the thread right at the very edge of the patch all the way around. Machine stitching sometimes wanders slightly on curved patch edges if you are not experienced with guiding fabric through at a steady pace.
Woven Patches on Jeans. What to Know.
Woven patches are flat and thin compared to embroidered patches. They have a finer thread structure and can carry more detail in a smaller area. On denim, they look particularly clean because the flat surface sits flush against the fabric without any raised texture creating visual noise.
For woven patches specifically, use a slightly finer thread than you would for a standard embroidered patch. The woven border is thinner than a merrowed embroidered border, and a very thick thread can look bulky against it.
Match the thread colour to the border of the woven patch exactly, and the stitching practically disappears. The patch appears to float on the denim surface with no visible attachment method.
How to Hand Sew a Patch to a Shirt Using the Same Method
The jeans method above works on shirts too with one small adjustment. Shirts are thinner and more flexible than denim, which means the patch can shift more easily while you sew.
Pin the patch more thoroughly on a shirt than you would on jeans. Use a pin on every side and one through the centre to stop any rotation. Use a finer needle than the heavy-duty one you need for denim. And pull each stitch slightly less firmly since shirt fabric gathers more easily than denim under tension.
The inside-the-garment rule still applies. Slide your hand inside the shirt body or the sleeve before sewing so you never accidentally stitch through to the back of the garment.
Where to Order Custom Patches Worth Sewing
Denim is one of the best fabrics in the world for custom patches. It holds stitching firmly, it ages beautifully around a patch border, and a great custom patch on a great pair of jeans is one of the most lasting personal style statements you can make.
Customers across the US, from New York to Nashville, are ordering custom patches from StitchKrafts USA to personalise denim jackets, jeans, bags, and hats. Every order comes with a real physical sample produced before the full run begins. You hold the actual patch in your hands and approve it before a single piece of the full order is made.
Whether you want embroidered patches, woven patches, or any other custom patch style, the production standard is consistent from sample to delivery.
Frequently Asked Questions
Can you sew a patch on jeans without a sewing machine?
Yes. Hand sewing works equally well on denim and gives you more control around corners and curved patch edges. Use a heavy-duty needle, a thimble on your middle finger, and 18 to 20 inches of thread per patch.
How do you stop the needle hurting your finger when sewing through thick denim?
Use a thimble on the middle finger of your sewing hand. Denim is significantly more resistant than shirt fabric and pushing a needle through both the denim and a patch backing repeatedly without protection will cause discomfort. A thimble fixes this completely.
Why do you need to slide your hand inside the jeans leg before sewing?
To separate the two layers of fabric. Without your hand inside, the needle can catch both the front and back of the jeans leg and stitch them together, partially sealing the leg. Your hand keeps the layers apart and lets you feel exactly where the needle is going.
Can you sew a patch over a hole in jeans?
Yes. Trim any frayed edges around the hole first. Cut or choose a patch at least half an inch larger than the hole on every side. Position it over the hole and sew around the full border. The patch covers the hole and the stitching holds the repair firmly in place.
What is the difference between sewing embroidered patches and woven patches on jeans?
The method is the same but the thread choice differs slightly. Woven patches have a thinner, flatter border than embroidered patches. Use a slightly finer thread on woven patches so the stitching does not look bulky against the thin border. Match the thread colour to the border exactly and the stitching becomes almost invisible.
How long does it take to sew a patch on jeans?
Between 15 and 25 minutes for most standard patches sewn by hand. Machine sewing is faster, around 5 to 10 minutes, but requires correct setup to avoid sewing through two layers of fabric accidentally.