

How to Sew a Patch on a Hat the Right Way
Quick Answer
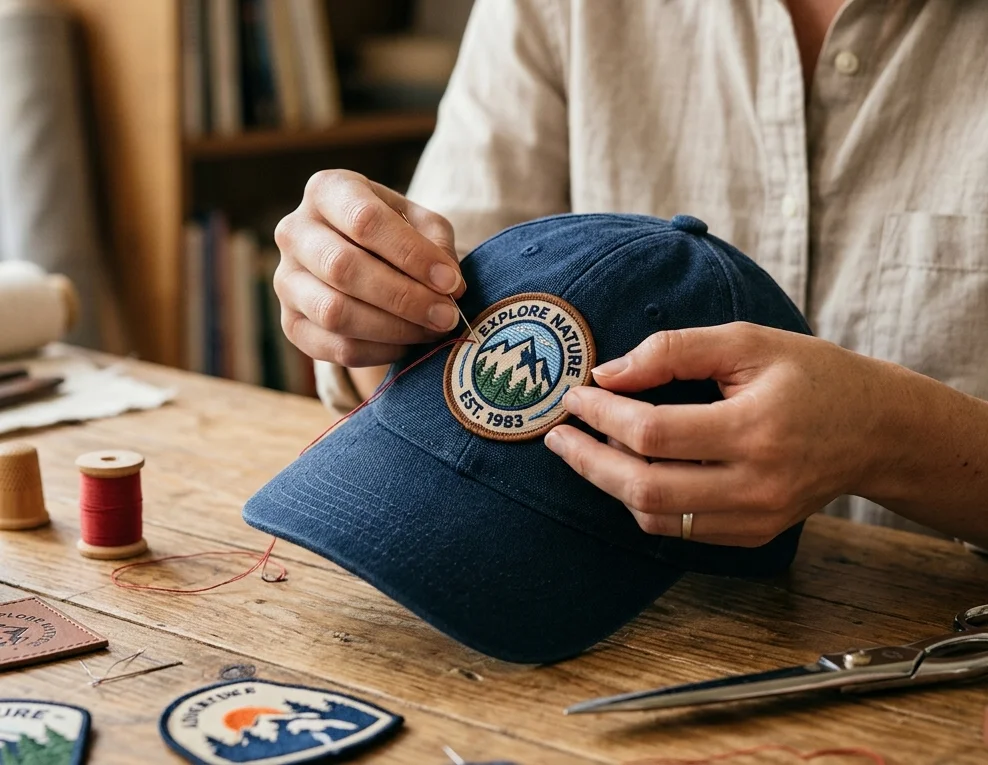
Put the hat on your head and decide exactly where the patch will sit. Glue it in place and let it dry. Thread a size 10 needle with 24 inches of thread that matches your patch border colour. Tie a knot. Turn the hat inside out. Push the needle through the hat and patch edge simultaneously and sew small even stitches all the way around the border. Tie off with a double knot on the inside. Done.
Why a Hat Is Trickier Than a Jacket
Sewing a patch onto a flat jacket panel is forgiving. A hat is a curved, structured object with multiple layers, a brim, and internal stiffening that resists the needle in ways flat fabric does not. Get it wrong, and the patch sits crooked, the thread shows on the outside, or the hat fabric puckers around the stitching.
The good news is that once you understand two things- why you glue before you sew and why you turn the hat inside out before you start- the rest of the process is completely straightforward. This guide covers both, plus everything in between.
Whether you are sewing an affordable embroidery patch onto a favourite cap in Austin, adding team crests to baseball caps in Phoenix, or applying a personalized chenille patch from StitchKrafts USA to a varsity-style hat, this method works every time.
What You Need
Everything here is available at any craft store or general retailer. Nothing specialist required.
- Size 10 needle
- Matching thread
- Scissors
- Thimble
- Fabric glue
- The hat
- The patch
Tip: Use about 24 inches of thread for a standard patch. Any shorter and you risk running out before completing the full border, which creates a weak join mid-stitch.
Step by Step, The Foolproof Way
Step 1: Decide Where the Patch Goes
Put the hat on your head before you do anything else. This is the step most people skip and the reason most hat patches end up in the wrong position. A hat changes shape completely when it is on a head versus lying flat on a table. The front panel curves. The crown pushes out. What looks centred on a flat hat can look tilted when worn.
Look in a mirror. Try the patch in a few positions by holding it against the hat while wearing it. Once you are certain of the placement, mark the spot lightly with a fabric pen or a small piece of tape.
Step 2: Glue the Patch in Place
Apply a thin, even layer of fabric glue to the back of the patch. Press the patch firmly onto the hat in the exact position you decided in Step 1. Hold it flat for 30 seconds, then leave it completely undisturbed until the glue has dried fully.
This is not the permanent fix. The stitching does that. The glue keeps the patch from shifting with every needle push while you sew around the border. Without it, the patch creeps slightly with each stitch and the finished placement is off.
Warning: Do not start sewing before the glue is fully dry. A patch that is still tacky will shift as you pull the thread through, undoing the purpose of gluing it in the first place.
Step 3: Thread the Needle
Cut 24 inches of thread in a colour that matches your patch border. For most affordable embroidery patches, the border is a merrowed edge in a single colour. Match that colour exactly, and the stitching disappears into the patch for a completely clean finish from the outside.
Thread the needle and tie a firm knot at the loose end. A single knot can slip back through fine hat fabric under tension, so tie it twice to be safe.
Step 4: Put the Thimble On
Place the thimble on the middle finger of your dominant hand. Hat fabric, especially the stiff front panel of a structured baseball cap, resists a needle significantly more than shirt or jacket fabric. The thimble protects your finger and gives you the control to push the needle through cleanly without the force coming from your fingertip alone.
Step 5: Turn the Hat Inside Out and Begin
Turn the hat inside out. This is the move that makes the whole job clean. By starting from the inside, every knot, thread end, and loop stays hidden on the inner surface where nobody ever sees it. The outside of the hat shows only even stitching running along the patch border.
Push the needle from the inside of the hat, through the hat fabric, and out through the edge of the patch simultaneously. Pull the thread through slowly. Hat fabric can bunch around the needle if you pull too fast, which causes the thread to tangle on the inside.
Step 6: Sew Around the Full Border
Continue sewing small, even stitches all the way around the patch border. Push the needle in through the hat fabric near the patch edge, bring it back up through the patch edge, pull through, and repeat. Keep each stitch about 3 to 5 mm apart.
Even spacing is what makes the stitching look deliberate rather than rushed. Work steadily and maintain the same tension after every stitch. Pulling too tight bunches the hat fabric around the patch, and pulling too loose leaves visible thread slack. Firm and flat is the goal throughout.
Tip: Go slowly around the corners and curved edges of the patch. Short stitches at corners keep the patch lying flat. One long stitch at a corner will lift slightly.
Step 7: Tie Off and Finish
When you have stitched all the way around and returned to the starting point, bring the needle and thread through to the inside of the hat. Tie a firm double knot close to the fabric. Trim the thread to about half an inch from the knot, just enough that it cannot work its way back through the fabric over time.
Turn the hat right side out. Look at the patch from the outside. The stitching should run evenly around the full border with consistent spacing throughout and no visible thread showing from the front.
Sewing Personalized Chenille Patches on a Hat
Personalized chenille patches are thicker and denser than standard embroidered patches. The raised pile base requires a slightly different approach to get clean results on a hat.
Use a heavier needle, a denim needle rather than a standard size 10, to handle the resistance of the chenille base. Use heavier thread as well. Stitch through the flat woven base at the very edge of the patch, not through the chenille pile itself. The pile is decorative. The woven base underneath it is where the stitch needs to grip.
Warning: Never iron a chenille patch onto a hat. Heat flattens the chenille pile permanently, and it does not recover. Always sew chenille patches, never iron them.
StitchKrafts USA produces personalized chenille patches with a solid, flat sew-on base that sits cleanly against hat fabric and takes the needle evenly all the way around. The base is firm enough to give each stitch a clean anchor without the fabric bunching under pressure.
Which Hat Types Work Best
| Hat Type | |||
| Cotton baseball cap | Yes | Size 10 sharp | The easiest hat for beginners |
| Canvas bucket hat | Yes | Size 10 sharp | Flat panels make stitching easy |
| Structured snapback | Yes | Size 10 sharp | Stiff front panel, thimble essential |
| Trucker cap | Yes | Size 10 sharp | Mesh back panels, patch on front panel only |
| Knit beanie | With care | Size 10 sharp | Stretchy knit shifts, go slowly |
| Wool flat cap | With care | Size 10 sharp | Test in a hidden spot first |
| Nylon running cap | Yes, sew only | Size 10 sharp | Never iron nylon. Sew only. |
The One Rule for Hats
Always decide placement with the hat on your head, never with it lying flat. The shape of a hat on a head is fundamentally different from its shape on a table. Two minutes checking placement in a mirror prevents a permanently misplaced patch.
The Patch Quality Makes the Sewing Easier
A cheap patch has an uneven border that is hard to stitch along consistently. The backing frays. The edge distorts as you push a needle through it repeatedly. The thread colours fade after a few washes.
A well-made patch has a clean, consistent merrowed edge that acts as a natural stitch guide all the way around. The backing lies flat against the hat. The border holds its shape under the needle. The thread quality holds colour through washing and sun.
StitchKrafts USA produces custom patch maker quality affordable embroidery patches with merrowed borders built to be stitched. Whether you are ordering personalized chenille patches for a Dallas team or custom embroidered patches for personal use anywhere in the country, we include a physical sample for approval before we produce the full order. You see the real patch in your hands before committing to quantity.
Frequently Asked Questions
Can you sew any patch onto a hat?
Yes. Embroidered patches, woven patches, and personalized chenille patches can all be sewn onto hats. Chenille patches need a heavier needle and thicker thread because the base is denser than a standard embroidered patch. Never iron chenille patches as heat flattens the pile permanently.
Why do you turn the hat inside out before sewing?
Turning the hat inside out lets you push the needle from the inside, which keeps all knots and thread ends hidden on the inner surface of the hat. The finished result looks completely clean from the outside with no visible knots or thread ends showing through the fabric.
Why do you glue the patch before sewing it?
Fabric glue holds the patch still while you sew around the border. Without it, the patch shifts slightly with every needle push, which leads to a crooked or misaligned result even when placement looked correct before starting. The glue is temporary. The stitching provides the permanent hold.
What size needle do you need to sew a patch on a hat?
A size 10 sharp needle works well for most hat patches, including embroidered and woven patches on cotton and canvas hats. For personalized chenille patches or structured caps with stiff front panels, use a denim needle, which handles greater fabric resistance without bending.
What thread should you use to sew a patch on a hat?
Use thread that matches the colour of your patch border. Matching thread blends into the merrowed edge and makes the stitching invisible from the outside. Cut about 24 inches of thread for a standard hat patch, enough to go around the full border without running short mid-stitch.
How long does it take to sew a patch on a hat?
Most standard embroidered patches take between 15 and 25 minutes to sew onto a hat by hand. Larger patches or personalized chenille patches with denser bases may take 25 to 35 minutes. The glue drying time adds an extra 10 to 15 minutes before sewing can begin.