How to Iron a Patch on a Hat Without Damage
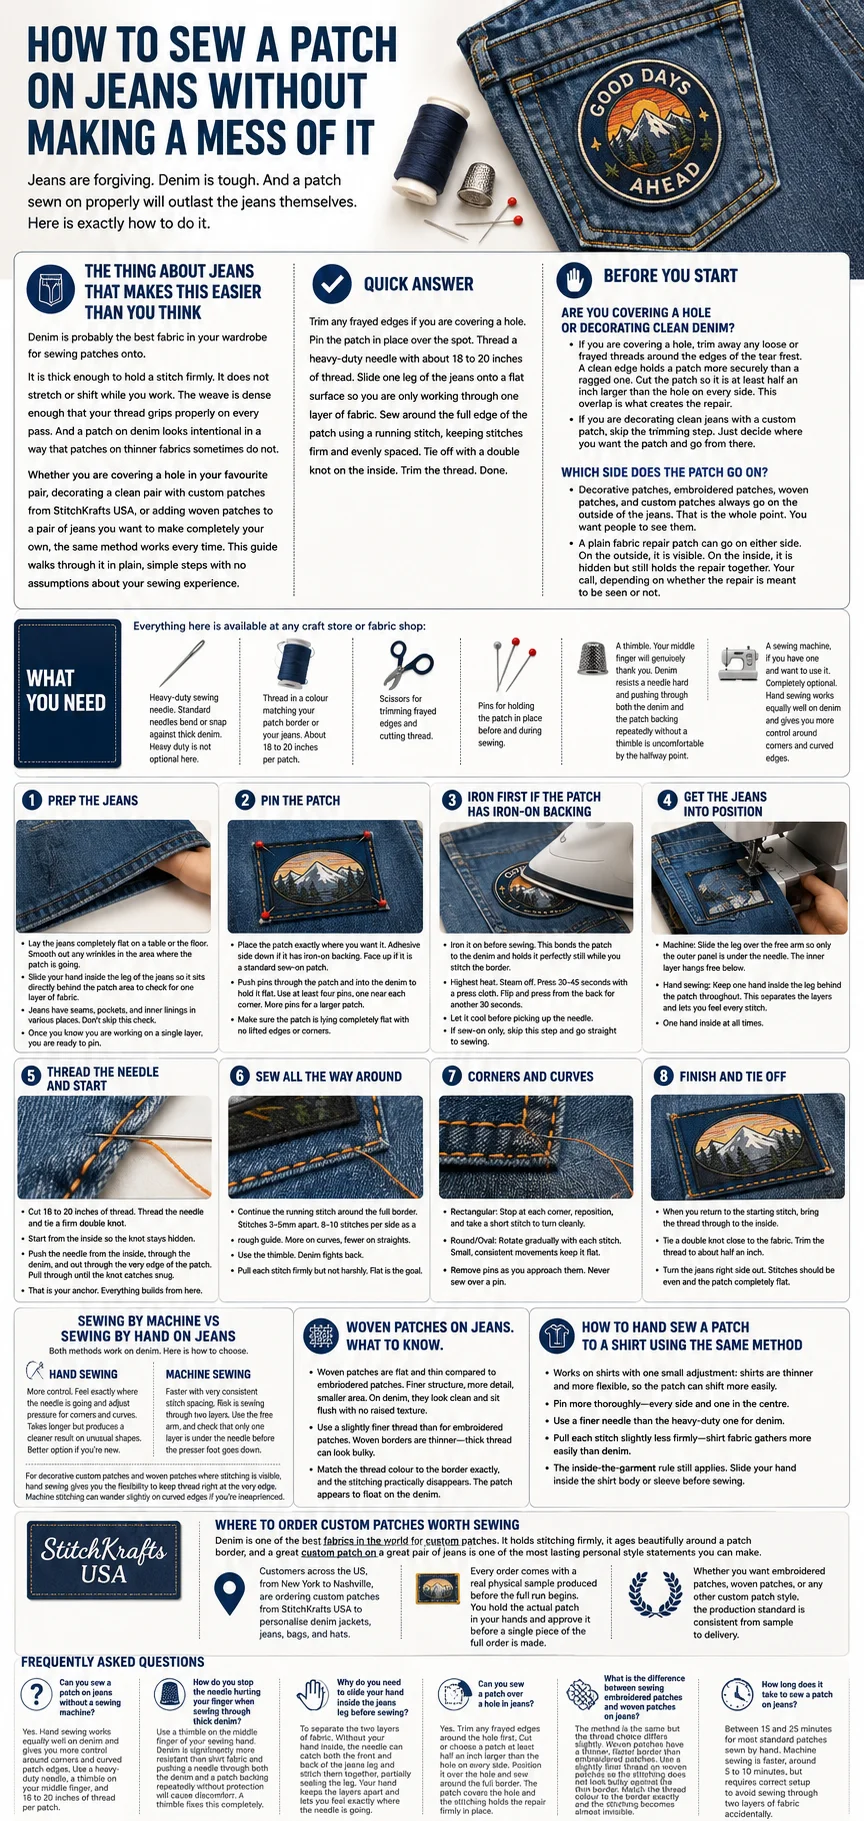
Hats are tricky. Curved brims, mixed materials, and small surface areas make hat patches the one job where technique actually matters. Here is how to get it right the first time.
Quick Answer
Check the hat material first: no nylon, no synthetic blends, no structured caps with plastic or cardboard brims. Set your iron to maximum heat with no steam. Place the patch on the front panel, cover with a thin cotton cloth, and press firmly in circular motions for 15 seconds. Then press around the edges for another 15 seconds. Let it cool completely before wearing.
Why Hats Are Different From Jackets and Bags
Ironing a patch onto a flat jacket panel is straightforward. Hats are not flat.
The curved surface means the iron cannot make full, even contact with the patch, the way it does on a shirt or backpack. Pressure is uneven. Heat distribution is inconsistent. And the internal structure of most caps, cardboard stiffening in the brim, plastic in the crown, can warp, scorch, or melt if heat is applied incorrectly.
Getting it right comes down to three things: checking the material, using the right technique for a curved surface, and knowing when iron-on is not the right method for the hat you are working with.
Step 1: Check the Hat Material First
This is the step most people skip. It is the most important one.
Find the care label inside the hat and read it. If it shows a crossed-out iron symbol or says "dry clean only," the iron-on method is not suitable; sewing is the correct approach.
Hats That Take Iron-On Patches Well
- Cotton twill baseball caps
- Canvas hats
- Cotton bucket hats
- Heavy cotton beanies
Hats That Do Not Work With Iron-On Application
- Nylon caps (heat melts and bubbles the surface)
- Polyester athletic hats (adhesive does not grip synthetic fabric reliably)
- Wool hats (too delicate for sustained high heat)
- Structured caps with cardboard brims (heat warps the brim permanently)
- Waterproof or treated hats ( iron destroys the coating)
If your hat is a standard cotton baseball cap from cities like New York, Chicago, or Los Angeles, where fitted and snapback caps dominate streetwear culture, you are almost certainly fine. If it is a performance athletic cap or a structured fitted hat, sew the patch on instead.
Step 2: Set Up the Iron
Set your iron to its highest heat setting. Turn the steam function completely off. Steam introduces moisture into the adhesive during activation, preventing a clean bond.
Give the iron two to three minutes to reach full working temperature. An iron that is not fully heated is the leading cause of patches that appear bonded but peel within days.
Step 3: Prepare the Hat
Lay the hat on a firm, padded surface. A folded towel on a table works well. You need slight padding beneath the application area; pressing on a bare hard surface reduces the contact between the iron and the patch.
If the hat has a structured front panel, slide a small piece of folded cloth or a rolled-up towel directly behind the panel you are working on. This supports the panel from below and provides a firmer pressing surface without putting pressure on the brim.
Smooth the front panel as flat as possible. Any fabric wrinkles under the patch will be pressed in permanently.
Step 4: Position the Patch
Place the patch exactly where you want it, adhesive side down, face side up.
Take a moment here. Once heat is applied to the adhesive, repositioning becomes messy. For a centred placement on the front panel, use your eye or a small piece of masking tape to mark the centre point before placing the patch.
Custom embroidered patches from StitchKrafts USA have clean, consistent merrowed borders that make precise placement easy. The edge is sharp and defined, so you can see exactly where the patch sits before pressing.
Step 5: Press With the Cloth
Drape a thin cotton cloth, a tea towel, a clean cotton cloth, or a thin pillowcase over the patch.
Place the hot iron directly over the patch on the cloth. Press firmly and move in slow circular motions for 15 seconds. Then concentrate the pressure around the edges of the patch for another 15 seconds, making sure the border makes full contact with the hat fabric.
Do not slide the iron aggressively. Circular motions adapt better to the slight curve of the hat panel than straight back-and-forth pressing.
Step 6: Cool and Test
Remove the cloth and set the iron aside. Let the patch cool completely for at least five minutes before touching the edges or wearing the hat.
Once cooled, gently press each edge with a fingertip to test the bond. If any corner feels loose, cover with the cloth and press again for another 15 seconds, focusing specifically on the lifting area.
How to Keep an Iron-On Patch From Falling Off a Hat
This is the question that matters most after the application.
Wait before wearing. The adhesive continues to cure for up to 24 hours after pressing. Wearing the hat immediately, when sweat, body heat, and handling put stress on the bond before it has fully set, is the single most common cause of early peeling.
Hand washes only, cold water. Machine washing a hat with an iron-on patch dramatically shortens the life of the bond. If the hat needs cleaning, hand-wash gently in cold water and reshape while damp.
Sew the border after ironing. For a patch that you want to last years rather than months, stitch around the edge after bonding. Iron first to position perfectly, then sew the border for a hold that will not loosen regardless of wear or washing. This is the professional standard for any hat patch meant to be permanent.
Start with a quality patch. Thin adhesive on cheap patches bonds inconsistently from the start, the centre holds, but the edges lift quickly. StitchKrafts USA patches use full-coverage backing with consistent adhesive weight across the complete reverse side, which means edge-to-edge bonding rather than just centre bonding.
Frequently Asked Questions
Can you iron a patch onto any hat?
No. Cotton and canvas hats work well. Nylon, polyester, wool, and structured caps with cardboard or plastic brims do not. Always check the care label first.
Can you use a hair dryer instead of an iron on a hat?
A hair dryer does not produce enough sustained heat to activate the iron-on adhesive fully. It can help soften an old patch for removal, but it is not a reliable application tool. Use a proper iron at maximum heat with no steam.
Why is my hat patch peeling at the edges?
The most common causes are insufficient press time at the edges, wearing or washing the hat too soon after application, or a synthetic hat fabric that does not reliably grip iron-on adhesive. For edge peeling on an otherwise bonded patch, repress the loose edges with the cloth, then stitch the border for a permanent fix.
Is sewing better than ironing for hat patches?
For hats specifically, sewing gives a more reliable long-term hold because the curved surface makes consistent iron pressure difficult. Iron-on works well for initial placement; sewing the border afterward gives the durability that iron-on alone cannot guarantee on a hat worn and washed regularly.