How to Sew on a Patch on a Sleeve Perfectly
Jersey sleeves move, stretch, and bunch more than any other part of a garment. Here is how to get a patch on straight, secure, and built to last.
Quick Answer
Wash and iron the sleeve first. Pin or tape the patch in place and try the shirt on to check the position with your arm inside the sleeve. Then sew around the full edge of the patch by hand or machine, working from inside the sleeve so you never stitch it shut. Finish with a secure knot and trim the thread.
Why Sleeves Are Different From Everywhere Else
A patch on a jacket front is sewn onto a flat panel. A patch on a sleeve is sewn onto a curved tube of fabric that moves with every arm motion. That difference changes everything about how the job should be done.
Sleeve fabric is also usually thinner than jacket fabric, particularly on knit cotton jerseys, which stretch and shift far more easily than woven material. If you have ever tried to sew a patch on a sleeve and ended up with puckered fabric or a wonky position, this is almost certainly why.
The good news is that once you understand why sleeves behave differently, the fix is simple. Whether you are sewing a team patch onto a baseball jersey in Boston, a club crest onto a hoodie sleeve in Atlanta, or a custom embroidered patch from StitchKrafts USA onto any sleeve at all, the same method works.
What You Need
Everything here is a basic sewing kit, available at any craft or fabric store:
| Item | |
| Sewing needle or sewing machine | Stitching the patch in place |
| Safety pin | Holding the patch still before sewing |
| Needle threading tool (optional) | Makes threading the needle easier |
| Adhesive ironing tape | An alternative to the safety pin while you sew |
| Scissors | Trimming thread |
| Iron | Pressing the sleeve flat and warming the fabric |
| Ironing board | A stable surface for pressing |
| Cotton cloth | Protecting the sleeve fabric from direct iron heat |
Step 1
Wash and Iron First
Wash the shirt before doing anything else. New garments often carry fabric softener or sizing residue that interferes with both adhesive tape and the smoothness of the fabric.
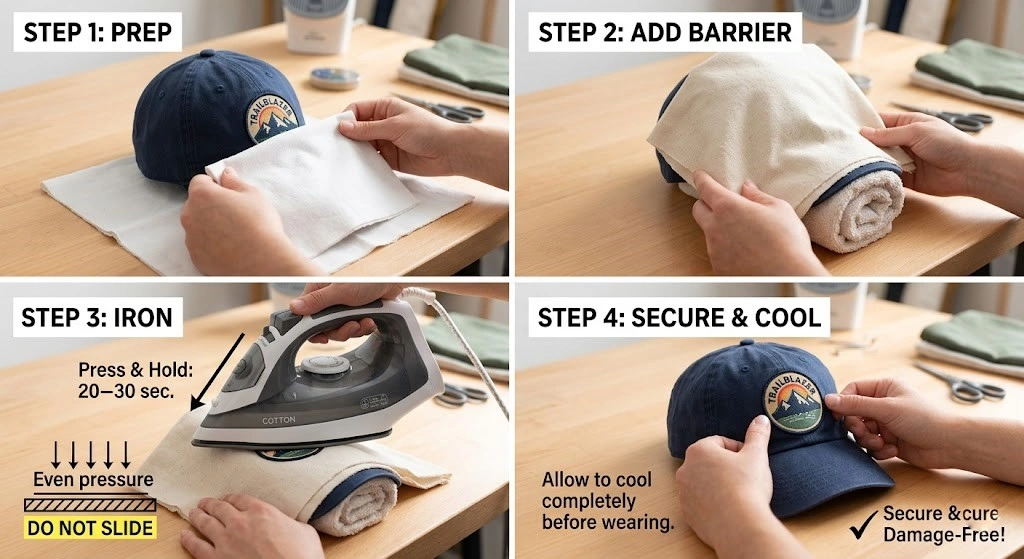
Once dry, iron the sleeve. Place a cotton cloth between the iron and the jersey fabric to protect it from direct heat, especially on synthetic or blended materials. A flat, wrinkle-free sleeve is much easier to sew accurately than a creased one.
Step 2
Decide on Placement
Figure out exactly where the patch needs to go. If you are sewing onto a team jersey, there is often a specific rule about position, usually a set distance from the shoulder seam. Check with your team or club before placing anything.
For personal jerseys or hoodies, hold the patch against the sleeve in a few positions and decide what looks right.
Step 3
Secure the Patch Before Sewing
Pin the patch in place using a safety pin through the center. This holds it still while you check the position.
Put the shirt on. This matters more on a sleeve than almost anywhere else on a garment. A patch that looks centered when the sleeve is laid flat can look crooked once your arm is actually inside it, and the fabric curves naturally around your bicep. Check it on your body before committing.
If the position looks right, take the shirt back off.
Step 4
Tape Instead of Pin (Optional but Useful)
A safety pin works, but it gets in the way while you are sewing, particularly on a sleeve, where your hand often needs to be inside the fabric tube at the same time as you are stitching.
Cut small strips of adhesive ironing tape to fit just under the edges of the patch. This holds the patch in position temporarily without a permanent bond, and without a pin poking at your fingers as you work.
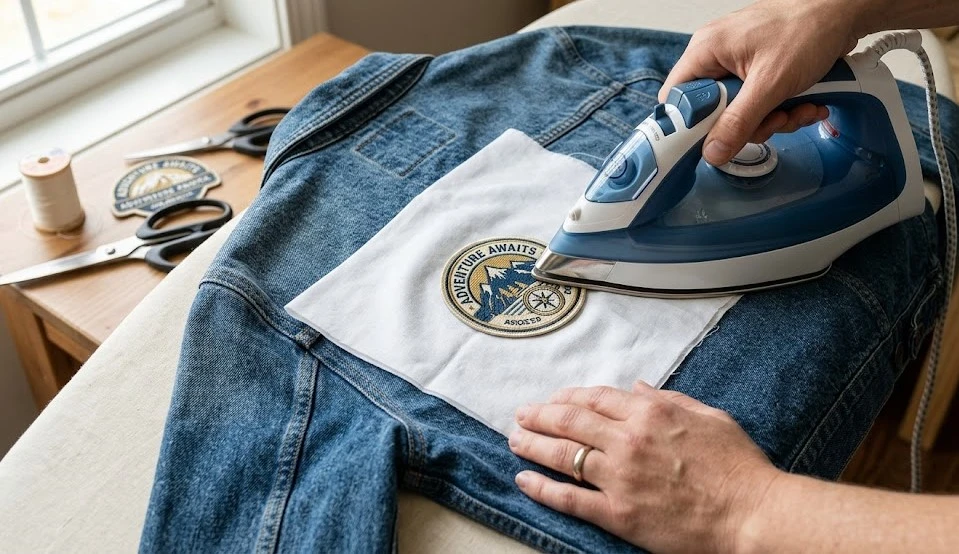
Lay the sleeve flat on the ironing board with the cotton cloth over the patch. Press with a warm iron for a few seconds to activate the tape and lightly tack the patch down. This is not the final bond; it just keeps everything still while you sew.
Step 5
Sewing by Hand
Hand sewing is the better choice for stretchy knit jersey fabric, which shifts more under a sewing machine than woven fabric does.
- Slide one hand inside the sleeve so you can hold the patch steady and feel where the needle is coming through from the other side.
- Thread your needle. A threading tool helps here; if you do not have one, wet and twist the end of the thread slightly to stiffen it before pushing it through the eye.
- Cut about 18 to 20 inches of thread and tie a knot at one end.
- Starting from inside the sleeve, push the needle upward through the fabric and out through the edge of the patch.
- Pull the thread until the knot catches against the inside of the sleeve.
- Push the needle back down through the fabric, right next to the edge of the patch.
- Pull the thread through to the inside.
- Repeat this stitch all the way around the patch, keeping your spacing even.
- For the final stitch, pull the thread through to the inside and tie it off with a secure knot.
- Trim the leftover thread to about half an inch from the knot.
Step 6
Sewing by Machine
A sewing machine is faster, but only suitable for woven fabric or sturdier jersey material, not for stretchy knit cotton, which a machine can pucker or pull unevenly.
- Check your sewing machine's manual if you are unfamiliar with it.
- Practice on a scrap piece of fabric first if you are not confident.
- Slide the sleeve over the sewing platform so you are only working through one layer of fabric. This is the single most important precaution on a sleeve, as sewing through both sides accidentally stitches the sleeve shut.
- Position the edge of the patch directly under the needle.
- Lower the presser foot to hold the patch steady.
- Set the machine to a low speed with a straight stitch.
- Keep your hands well clear of the needle.
- Begin sewing, keeping the patch edge aligned under the needle as you go.
- On a curved or circular patch, rotate it gradually as the machine stitches.
- On a patch with square corners, stop at each corner, lift the presser foot, rotate the patch 90 degrees, lower the foot, and continue.
- Once you have gone all the way around, overlap the first few stitches to lock the seam.
- Use the reverse function for a few backward stitches as a finishing lock.
- Lift the presser foot and cut the thread.
How to Stop Patches Falling Off, Iron-On and Sewn Alike
A patch that is sewn well rarely falls off. But many sleeve patches start as iron-on, and this is where most failures happen.
Heat alone is not enough on a sleeve. Sleeve fabric flexes constantly with arm movement, which puts more stress on an iron-on bond than almost any other part of a garment. If your patch is iron-on only, sew around the border afterward. This single step is the difference between a patch that survives one wash and one that survives years of wear.
Check the fabric type before ironing. Iron-on adhesive grips cotton and cotton-blend jerseys reliably. It doesn't grip polyester performance fabrics or moisture-wicking sportswear well. These fabrics should be sewn from the start, with no iron involved.
Wait before washing. If a patch has been ironed on, give it at least 24 hours before the first wash. Washing too soon, before the adhesive has fully cured, is one of the most common reasons iron-on patches lift at the edges within days.
Quality patches hold better from the start. A patch with thin or uneven adhesive struggles to bond evenly across the whole surface, which means the edges, the part under the most stress on a moving sleeve, lift first. Custom embroidered patches from StitchKrafts USA are made with consistent full-coverage backing, which gives a stronger starting bond before a single stitch goes in.
Knit Jersey vs Woven Fabric: Quick Comparison
| Fabric Type | ||
| Woven jersey or polyester blend | Hand or machine | Stable fabric, holds shape well under the needle |
| Knit cotton jersey | Hand sewing | Stretches and shifts too easily for clean machine stitching |
| Performance/moisture-wicking fabric | Hand sewing, no iron | Synthetic fibers do not take iron-on adhesive reliably |
| Heavy cotton hoodie sleeve | Machine or hand | Thick enough to handle either method well |
Frequently Asked Questions
Why does my patch look crooked once I put the shirt on?
A sleeve curves around the arm, so a patch that looks straight when the sleeve is laid flat can shift visually once worn. Always try the shirt on with the patch pinned or taped in place before sewing it permanently.
Can I use a sewing machine on a stretchy jersey sleeve?
It is possible but riskier than hand sewing. Knit fabric shifts under the machine's feed and can pucker. Hand sewing gives more control over stretchy material and is the safer choice if you are not confident with a machine.
How do I stop iron-on patches from falling off a sleeve?
Sew around the border after ironing. Sleeves flex constantly with arm movement, which puts more strain on the adhesive than on flatter parts of a garment. The iron-then-sew combination holds far longer than either method alone.
What is the risk of sewing through both layers of a sleeve?
You accidentally stitch the sleeve shut. Always slide the sleeve over the sewing platform, or slide your hand inside the sleeve for hand sewing, so the needle only passes through one layer of fabric at a time.
How long should I wait before washing a jersey with a new patch?
At least 24 hours if the patch involved any iron-on adhesive. This gives the bond time to fully cure before it faces the stress of a wash cycle.
The One Thing That Matters Most on a Sleeve
Always work through one layer of fabric only. Slide your hand inside for hand sewing, or slide the sleeve over the sewing platform for machine work. This single habit prevents the most common and most frustrating sleeve patching mistake there is.
Everything else, even stitches, secure knots, and good placement, gets easier with practice. Get the one-layer rule right from the start, and the rest follows naturally.